Casio XJ-A240 User Guide - Page 24
Using the Setup Menu - mount
 |
View all Casio XJ-A240 manuals
Add to My Manuals
Save this manual to your list of manuals |
Page 24 highlights
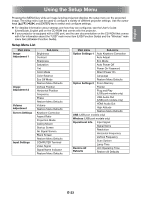
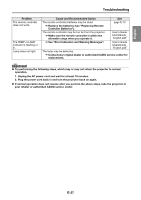
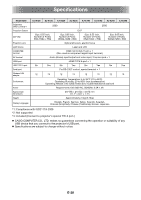
English Using the Setup Menu Pressing the [MENU] key while an image is being projected displays the setup menu on the projected image. The setup menu can be used to configure a variety of different projector settings. Use the cursor keys and [ENTER] key to select and configure settings. For detailed information about settings and how they are configured, see the User's Guide (UsersGuide_English.pdf) on the CD-ROM that comes with the projector. If your projector is equipped with a USB port, see the user documentation on the CD-ROM that comes with it for information about the "USB" main menu item (USB Function Guide) and the "Wireless" main menu item (Wireless Function Guide). Setup Menu List Main menu Image Adjustment 1 Image Adjustment 2 Volume Adjustment Screen Settings Input Settings Sub-menu Brightness Contrast Sharpness Saturation Tint Color Mode Color Balance Eco Off Mode Restore Menu Defaults Vertical Position Horizontal Position Frequency Phase Restore Menu Defaults Volume Restore Menu Defaults Keystone Correction Aspect Ratio Projection Mode Ceiling Mount Startup Screen No Signal Screen Blank Screen Restore Menu Defaults COMPUTER Terminal Video Signal Signal Name Indicator Restore Menu Defaults Main menu Sub-menu Option Settings 1 Auto Keystone Correction Auto Adjust Eco Mode Auto Power Off Power On Password Direct Power On Language Restore Menu Defaults Option Settings 2 Zoom Memory Pointer Plug and Play (USB port models only) USB Audio Out (USB port models only) HDMI Audio Out High Altitude Restore Menu Defaults USB (USB port models only) Wireless (USB port models only) Operational Info Input Signal Signal Name Resolution Horizontal Frequency Vertical Frequency Scan System Lamp Time Restore All Defaults Unit Operating Time Restore All Defaults E-23
-
 1
1 -
2
-
3
-
4
-
5
-
6
-
7
-
8
-
9
-
10
-
11
-
12
-
13
-
14
-
15
-
16
-
17
-
18
-
 19
19 -
 20
20 -
 21
21 -
 22
22 -
 23
23 -
 24
24 -
 25
25 -
 26
26 -
 27
27 -
 28
28 -
 29
29 -
30
-
31
-
32
-
33
-
34
-
35
-
36
-
37
 |
 |
