Celestron CPC Deluxe 800 HD Computerized Telescope CPC Deluxe HD Manual - Page 30
CCD IÀaging
 |
View all Celestron CPC Deluxe 800 HD Computerized Telescope manuals
Add to My Manuals
Save this manual to your list of manuals |
Page 30 highlights
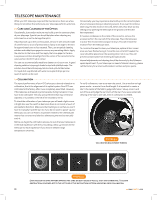
metering which lets you know if your picture is under or overexposed. Adjustments for proper exposures are made by changing the shutter speed. Consult your camera's manual for specific information on metering and changing shutter speeds Reducing Vibration Releasing the shutter manually can cause vibrations, producing blurred photos. To reduce vibration when tripping the shutter, use a cable release. A cable release keeps your hands clear of the camera and lens, thus eliminating the possibility of introducing vibration. Mechanical shutter releases can be used, though air-type releases are best. Blurry pictures can also result from shutter speeds that are too slow. To prevent this, use films that produce shutter speeds greater than 1/250 of a second when hand-holding the lens. If the lens is mounted on a tripod, the exposure length is virtually unlimited. Another way to reduce vibration is with the Vibration Suppression Pads (#93503). These pads rest between the ground and tripod feet. They reduce the vibration amplitude and vibration time. The following is a brief description of the advantages of imaging at each f-number configuration and the proper equipment needed to use the telescope in any of its many settings f/6.3 with Reducer/Corrector When imaging some objects like planetary nebula (for example M57, the Ring Nebula) and small galaxies (M104, the Sombrero Galaxy), larger image scale is needed to resolve finer detail. These objects are better shot at f/6.3 or even f/10. Medium size to small galaxies - f/6.3 imaging gives you finer resolution then at f/2, but the slower f-number will usually require you to guide the image while you are taking longer exposures. Guiding can be accomplished by using an optional Radial Guider or a piggyback guide scope. The exposure times are about 10 times longer, but the results can be worth the extra effort. There are some objects that are small enough and bright enough that they work great at f/6.3. M104 (the Sombrero Galaxy) can be imaged under dark skies with a series of short exposures using Track and Accumulate. Ten exposures at 15 seconds each will yield a nice image and is short enough that you may not need to guide the exposure at all. For f/6.3 imaging, the optional Reducer/Corrector is needed. (See Optional Accessory section at the end of this manual). Lunar or small planetary nebulae - f/10 imaging is more challenging for long exposure, deep-sky imaging. Guiding needs to be very accurate and the exposure times need to be much longer, about 25 times longer than f/2. There are only a select few objects that work well at f/10. The Moon images fine because it is so bright, but planets are still a bit small and should be shot at f/20. The Ring Nebula is a good candidate because it is small and bright. The Ring Nebula (M57) can be imaged in about 30-50 seconds at f/10. The longer the exposure, the better. Planetary or Lunar - f/20 is a great way to image the planets and features on the Moon. When imaging the planets, very short exposures are needed. The exposure lengths range from .03 to .1 seconds on planetary images. Focus is critical as is good atmospheric conditions. Generally you will take one image after another until one looks good. This is due to the atmospheric "seeing" conditions. For every 10 exposures you might save 1. To image at f/20, you need to purchase a 2x Barlow and a T-adapter or Radial Guider. >> CCD Imaging Fastar Option - Using your EdgeHD telescope at f/2 with optional lens assembly. The EdgeHD telescopes are equipped with a removable secondary mirror that allows you to convert your f/10 telescope into an f/2 imaging system capable of exposure times 25 times shorter than those needed with a f/10 system! The Fastar compatible telescope's versatility allows it to be used in many different f-number configurations for CCD imaging, making it the most versatile imaging system available today. With an optional lens assembly you can easily convert your Fastar compatible telescope to f/2 prime focus use in a matter of seconds. This makes the system ideal for imaging deep-sky objects as well as planetary detail. Described below is the configuration of each f-number and the type of object best suited to that kind of imaging. Secondary Mirror Secondary Mirror Retaining Ring Corrector Plate Secondary Mirror Mount Handle FIGURE 8-5 The Fastar Compatible Optical System The above figure shows how the secondary mirror is removed when using the optional CCD camera for f/2 imaging. Warning: The secondary mirror should never be removed unless installing the optional f/2 lens assembly. Adjustments to collimation can easily be made by turning the screws on the top of the secondary mirror mount without ever having to remove the secondary mirror (see Telescope Maintenance section of this manual). The f/# stands for the ratio between the focal length and the diameter of the light gathering element. For example, the EdgeHD 11" optical tube has a focal length of 110 inches and a diameter of 11 inches. This makes the system an f/10, (focal length divided by diameter). When the secondary is removed and the CCD camera is placed at the Fastar position, the system becomes f/2. This is a unique feature to some Celestron telescopes (see figures below). f/2 Lens Assembly FIGURE 8-6 CCD Camera FIGURE 8-7 28 >> www.celestron.com
-
 1
1 -
2
-
3
-
4
-
5
-
6
-
7
-
8
-
9
-
10
-
11
-
12
-
13
-
14
-
15
-
16
-
17
-
18
-
19
-
20
-
21
-
22
-
23
-
24
-
 25
25 -
 26
26 -
 27
27 -
 28
28 -
 29
29 -
 30
30 -
 31
31 -
 32
32 -
 33
33 -
 34
34 -
 35
35 -
36
-
37
-
38
-
39
-
40
-
41
-
42
-
43
-
44
-
45
-
46
-
47
-
48
-
49
-
50
 |
 |
