Cisco VG224 Quick Start Guide - Page 6
Chassis Installation Options, Using the Correct Bracket Screws - voltage
 |
UPC - 746320575360
View all Cisco VG224 manuals
Add to My Manuals
Save this manual to your list of manuals |
Page 6 highlights
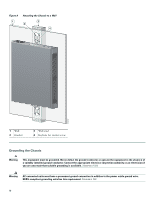
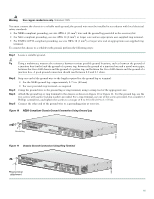
safety warnings that accompanied this device. Note: SAVE THESE INSTRUCTIONS Note: This documentation is to be used in conjunction with the specific product installation guide that shipped with the product. Statement 1071 Warning Only trained and qualified personnel should be allowed to install or replace this equipment. Statement 1030 Warning This unit is intended for installation in restricted access areas. A restricted access area can be accessed only through the use of a special tool, lock and key, or other means of security. Statement 1017 Warning Ultimate disposal of this product should be handled according to all national laws and regulations. Statement 1040 Warning This equipment must be installed and maintained by service personnel as defined by AS/NZS 3260. Incorrectly connecting this equipment to a general-purpose outlet could be hazardous. The telecommunications lines must be disconnected 1) before unplugging the main power connector or 2) while the housing is open, or both. Statement 1043 Warning Blank faceplates and cover panels serve three important functions: they prevent exposure to hazardous voltages and currents inside the chassis; they contain electromagnetic interference (EMI) that might disrupt other equipment; and they direct the flow of cooling air through the chassis. Do not operate the system unless all cards, faceplates, front covers, and rear covers are in place. Statement 1029 Chassis Installation Options You can set the chassis on a desktop, install it in a rack, or mount it on a wall. Tip Before proceeding, consider the location of the equipment with respect to a good ground. See the "Grounding the Chassis" section on page 10. See the following instructions: • Using Quick Installation Brackets, page 7 • Using the Correct Bracket Screws, page 6 • Rack-Mounting the Chassis, page 7 • Wall-Mounting the Chassis, page 8 • Grounding the Chassis, page 10 Caution Use only the mounting hardware supplied with this product. Using the Correct Bracket Screws Two sets of bracket attachment screws are provided, in separate packages. Take care to use each screw type, and washers as needed, in the appropriate locations. Table 1 summarizes the bracket attachment screw types. 6
-
 1
1 -
 2
2 -
 3
3 -
 4
4 -
 5
5 -
 6
6 -
 7
7 -
 8
8 -
 9
9 -
 10
10 -
 11
11 -
 12
12 -
13
-
14
-
15
-
16
-
17
-
18
-
19
-
20
 |
 |
