Cisco VG224 Quick Start Guide - Page 7
Using Quick Installation Brackets, Rack-Mounting the Chassis, Rack-mounting
 |
UPC - 746320575360
View all Cisco VG224 manuals
Add to My Manuals
Save this manual to your list of manuals |
Page 7 highlights
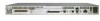
Table 1 Bracket Attachment Screws for Rack-Mounting and Wall-Mounting Rack-mounting Wall-mounting • Eight Phillips head screws (four per bracket) • Four 6-32 slotted hex screws (two per bracket) and four plastic washers • Washers are not required • Washers are required Using Quick Installation Brackets A new bracket accompanies this product. See Figure 4. This bracket, with a keyhole feature, facilitates wall-mounting by allowing the installer to rest the bracket on a starter screw, freeing the installer's hands. • To rack-mount the unit, you have three positioning options. See the "Rack-Mounting the Chassis" section on page 7. • To wall-mount the unit, attach the short leg of the bracket to the chassis at the pair of holes in the center of the chassis side. See the "Wall-Mounting the Chassis" section on page 8. Figure 4 Quick Installation Bracket 88815 Rack-Mounting the Chassis The following warning applies only when the unit is rack-mounted: Warning To prevent bodily injury when mounting or servicing this unit in a rack, you must take special precautions to ensure that the system remains stable. The following guidelines are provided to ensure your safety: This unit should be mounted at the bottom of the rack if it is the only unit in the rack. When mounting this unit in a partially filled rack, load the rack from the bottom to the top with the heaviest component at the bottom of the rack. If the rack is provided with stabilizing devices, install the stabilizers before mounting or servicing the unit in the rack. Statement 1006 To rack-mount the chassis, follow this procedure: Step 1 Choose one of the methods shown in Figure 5, Figure 6, or Figure 7, and attach the long leg of the mounting brackets to the chassis, as shown. Caution Make sure to use the correct screws for this mounting option (see Table 1 on page 7). 7
-
 1
1 -
 2
2 -
 3
3 -
 4
4 -
 5
5 -
 6
6 -
 7
7 -
 8
8 -
 9
9 -
 10
10 -
 11
11 -
 12
12 -
13
-
14
-
15
-
16
-
17
-
18
-
19
-
20
 |
 |