Cisco WRH54G User Guide - Page 19
Configuring the Wireless-G Home Router - password
 |
View all Cisco WRH54G manuals
Add to My Manuals
Save this manual to your list of manuals |
Page 19 highlights
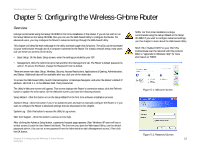
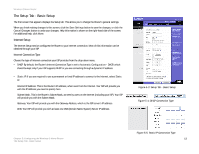
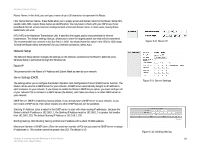
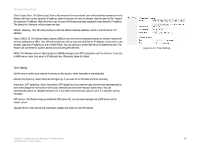
Wireless-G Home Router Chapter 5: Configuring the Wireless-G Home Router Overview Linksys recommends using the Setup CD-ROM for first-time installation of the Router. If you do not wish to run the Setup Wizard on the Setup CD-ROM, then you can use the Web-based Utility to configure the Router. For advanced users, you may configure the Router's advanced settings through the Web-based Utility. This chapter will describe each web page in the Utility and each page's key functions. The utility can be accessed via your web browser through use of a computer connected to the Router. For a basic network setup, most users will use these two screens of the Utility: • Basic Setup. On the Basic Setup screen, enter the settings provided by your ISP. • Management. Click the Administration tab and then the Management tab. The Router's default password is admin. To secure the Router, change the Password from its default. There are seven main tabs: Setup, Wireless, Security, Access Restrictions, Applications & Gaming, Administration, and Status. Additional tabs will be available after you click one of the main tabs. To access the Web-based Utility, launch Internet Explorer or Netscape Navigator, and enter the Router's default IP address, 192.168.1.1, in the Address field. Then press Enter. The Utility's Welcome screen will appear. This screen displays the Router's connection status; click the Refresh button to update the information. On the Welcome screen, you have the following choices: Setup Wizard - Click this button to run the Setup Wizard for the first-time software installation process. Advance Setup - Click this button if you're an advanced user and want to manually configure the Router or if you want to configure the Router's advanced settings that are discussed in this chapter. System Log - Click this button to access the Utility's Log screen. Web Tech Support - Click this button to access on-line help. After clicking the Advance Setup button, a password request page appears. (Non-Windows XP users will see a similar screen.) Leave the User Name field blank. The first time you open the Web-based Utility, use the default password admin. (You can set a new password from the Administration tab's Management screen.) Then click the OK button. Chapter 5: Configuring the Wireless-G Home Router Overview NOTE: For first-time installation, Linksys recommends using the Setup Wizard on the Setup CD-ROM. If you want to configure advanced settings, use this chapter to learn about the Web-based Utility. HAVE YOU: Enabled TCP/IP on your PCs? PCs communicate over the network with this protocol. Refer to "Appendix D: Windows Help" for more information on TCP/IP. Figure 5-1: Welcome Screen Figure 5-2: Password Screen 12
-
 1
1 -
2
-
3
-
4
-
5
-
6
-
7
-
8
-
9
-
10
-
11
-
12
-
13
-
 14
14 -
 15
15 -
 16
16 -
 17
17 -
 18
18 -
 19
19 -
 20
20 -
 21
21 -
 22
22 -
 23
23 -
 24
24 -
25
-
26
-
27
-
28
-
29
-
30
-
31
-
32
-
33
-
34
-
35
-
36
-
37
-
38
-
39
-
40
-
41
-
42
-
43
-
44
-
45
-
46
-
47
-
48
-
49
-
50
-
51
-
52
-
53
-
54
-
55
-
56
-
57
-
58
-
59
-
60
-
61
-
62
-
63
-
64
-
65
-
66
-
67
-
68
-
69
-
70
-
71
-
72
-
73
-
74
-
75
-
76
-
77
-
78
-
79
-
80
-
81
-
82
-
83
-
84
-
85
-
86
-
87
-
88
-
89
 |
 |
