Compaq ProLiant 400 Microsoft Small Business Server 2000 Installation Instruct - Page 9
Procedures, Steps, 145Z-0301B-WWEN - proliant 6000 server
 |
View all Compaq ProLiant 400 manuals
Add to My Manuals
Save this manual to your list of manuals |
Page 9 highlights
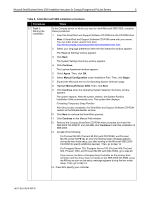
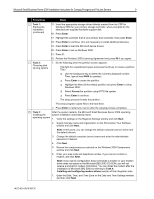
Microsoft Small Business Server 2000 Installation Instructions for Compaq Prosignia and ProLiant Servers 9 √ Procedures … Task 1: Starting the installation (continued) Steps 15. Insert the appropriate storage driver diskette created from the CSP for Windows 2000 for your primary storage controller, when prompted for the Manufacturer-supplied hardware support disk. 16. Press Enter. 17. Highlight the controller that is your primary boot controller, then press Enter. 18. Press Enter to continue. (It is not necessary to install additional devices.) 19. Press Enter to load the Microsoft device drivers. 20. Press Enter to set up Windows 2000. 21. Press C. 22. Review the Windows 2000 Licensing Agreement and press F8 if you agree. … Task 2: Choosing disk carving options 1. Do the following when the partition screen appears: • Highlight the unpartitioned space and press the C key to create a partition. Then ‰ Use the backspace key to delete the currently displayed number. Then, type at least 6000 (or greater). ‰ Press Enter to create the partition. ‰ Highlight the New (Unformatted) partition and press Enter to setup Windows 2000. ‰ Select Format the partition using NTFS file system. ‰ Press Enter to continue. The setup process formats the partition. The setup program copies files to the hard drive. 2. Press Enter to restart your server after the copying process completes. … Task 3: After the system restarts, the Microsoft Small Business Server 2000 operating Installing the system installation automatically starts. operating system 1. Verify the settings on the Regional Settings window and click Next. 2. Supply licensee name and organization on the Personalize Your Software window and click Next. Note: At this point, you can change the default computer (server) name and the default domain. 3. Change the default computer (server) name and enter the administrator password, if desired. 4. Click Next. 5. Review the components pre-selected on the Windows 2000 Components window and click Next. 6. Enter your area code and telephone number, if your server contains a modem, and click Next. Note: If your server configuration does not include a modem or your modem driver does not reside on the Microsoft SBS 2000 CD-ROM, you will not receive a prompt for modem information. You can install the modem after the installation of Microsoft SBS 2000 by referring to Task 4: Installing and configuring modem drivers section of this integration note. 7. Enter the Date, Time, and Time Zone on the Date and Time Settings window, and then click Next. 145Z-0301B-WWEN
-
 1
1 -
2
-
3
-
 4
4 -
 5
5 -
 6
6 -
 7
7 -
 8
8 -
 9
9 -
 10
10 -
 11
11 -
 12
12 -
 13
13 -
 14
14 -
15
 |
 |
