Craftsman 21237 Operation Manual - Page 12
Warning]
 |
View all Craftsman 21237 manuals
Add to My Manuals
Save this manual to your list of manuals |
Page 12 highlights
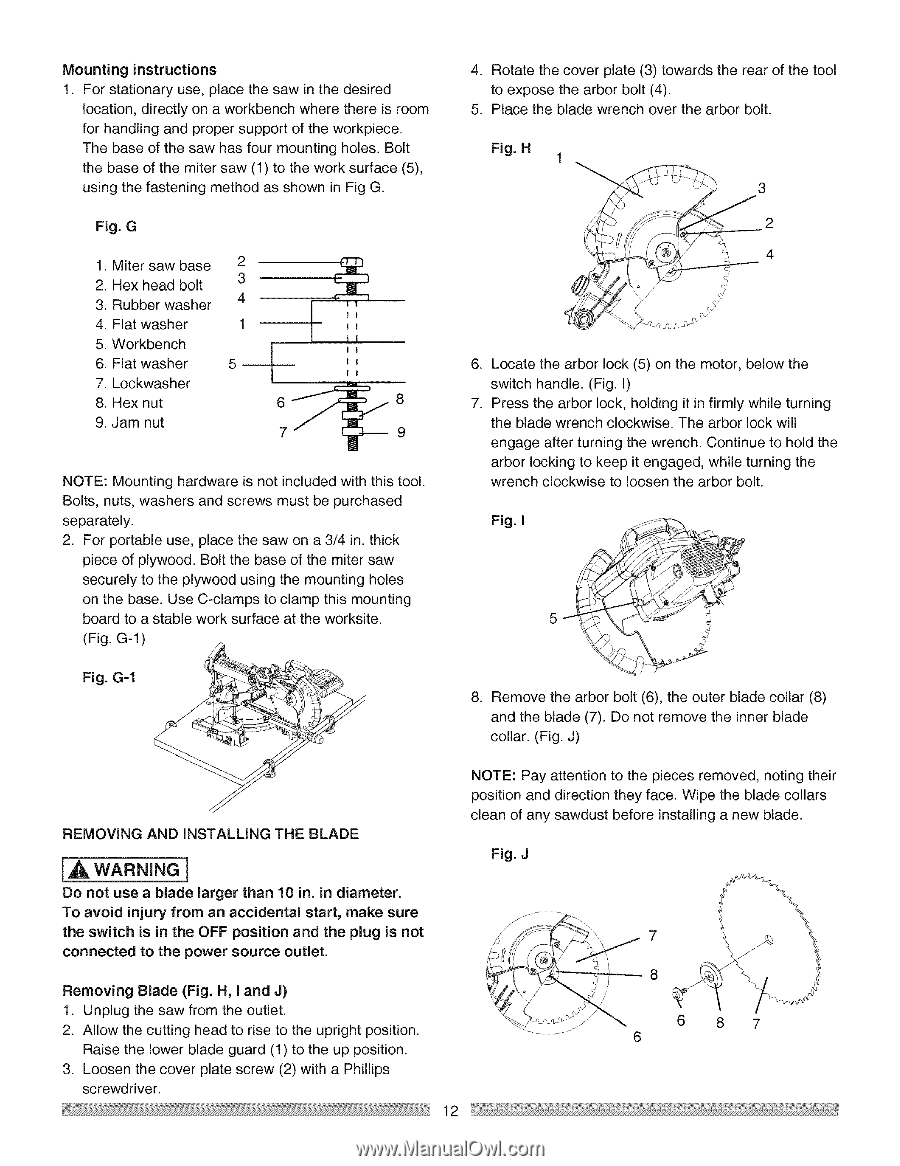
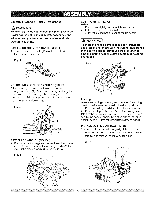
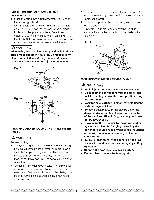
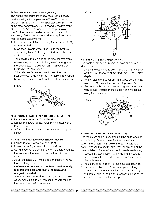
Mountinginstructions 1. For stationary use, place the saw in the desired location, directly on a workbench where there is room for handling and proper support of the workpiece. The base of the saw has four mounting holes. Bolt the base of the miter saw (1) to the work surface (5), using the fastening method as shown in Fig G. Fig. G 12.. MHeitxer hseaawd bbaoslte 23 3. Rubber washer 4 4. Flat washer 1 5. Workbench 6. Flat washer 5 7. Lockwasher 89.. HJaemx nnuutt _ ,, _ _I I1 _ 8 9 NOTE: Mounting hardware is not included with this tool. Bolts, nuts, washers and screws must be purchased separately. 2. For portable use, place the saw on a 3/4 in. thick piece of plywood. Bolt the base of the miter saw securely to the plywood using the mounting holes on the base. Use C-clamps to clamp this mounting board to a stable work surface at the worksite. (Fig. G-1 ) 4. Rotate the cover plate (3) towards the rear of the tool to expose the arbor bolt (4). 5. Place the blade wrench over the arbor bolt. Fig.H 3 2 4 // . Locate the arbor lock (5) on the motor, below the switch handle. (Fig. I) 7. Press the arbor lock, holding it in firmly while turning the blade wrench clockwise. The arbor lock will engage after turning the wrench. Continue to hold the arbor locking to keep it engaged, while turning the wrench clockwise to loosen the arbor bolt. Fig.I 5 Fig.G-1 8. Remove the arbor bolt (6), the outer blade collar (8) and the blade (7). Do not remove the inner blade coltar. (Fig. J) REMOVING AND INSTALLING THE BLADE WARNING] Do not use a blade larger than 10 in. in diameter. To avoid injury from an accidental start, make sure the switch is in the OFF position and the plug is not connected to the power source outmet. NOTE: Pay attention to the pieces removed, noting their position and direction they face. Wipe the blade collars clean of any sawdust before installing a new blade. Fig. J Removing Blade (Fig. H, I and J) 1. Unplug the saw from the outlet. 2. Allow the cutting head to rise to the upright position. Raise the lower blade guard (1) to the up position. 3. Loosen the cover plate screw (2) with a Phillips screwdriver. 12 87
-
 1
1 -
2
-
3
-
4
-
5
-
6
-
 7
7 -
 8
8 -
 9
9 -
 10
10 -
 11
11 -
 12
12 -
 13
13 -
 14
14 -
 15
15 -
 16
16 -
 17
17 -
18
-
19
-
20
-
21
-
22
-
23
-
24
-
25
-
26
-
27
-
28
-
29
-
30
 |
 |