Craftsman 21829 Operation Manual - Page 40
To Replace
 |
View all Craftsman 21829 manuals
Add to My Manuals
Save this manual to your list of manuals |
Page 40 highlights
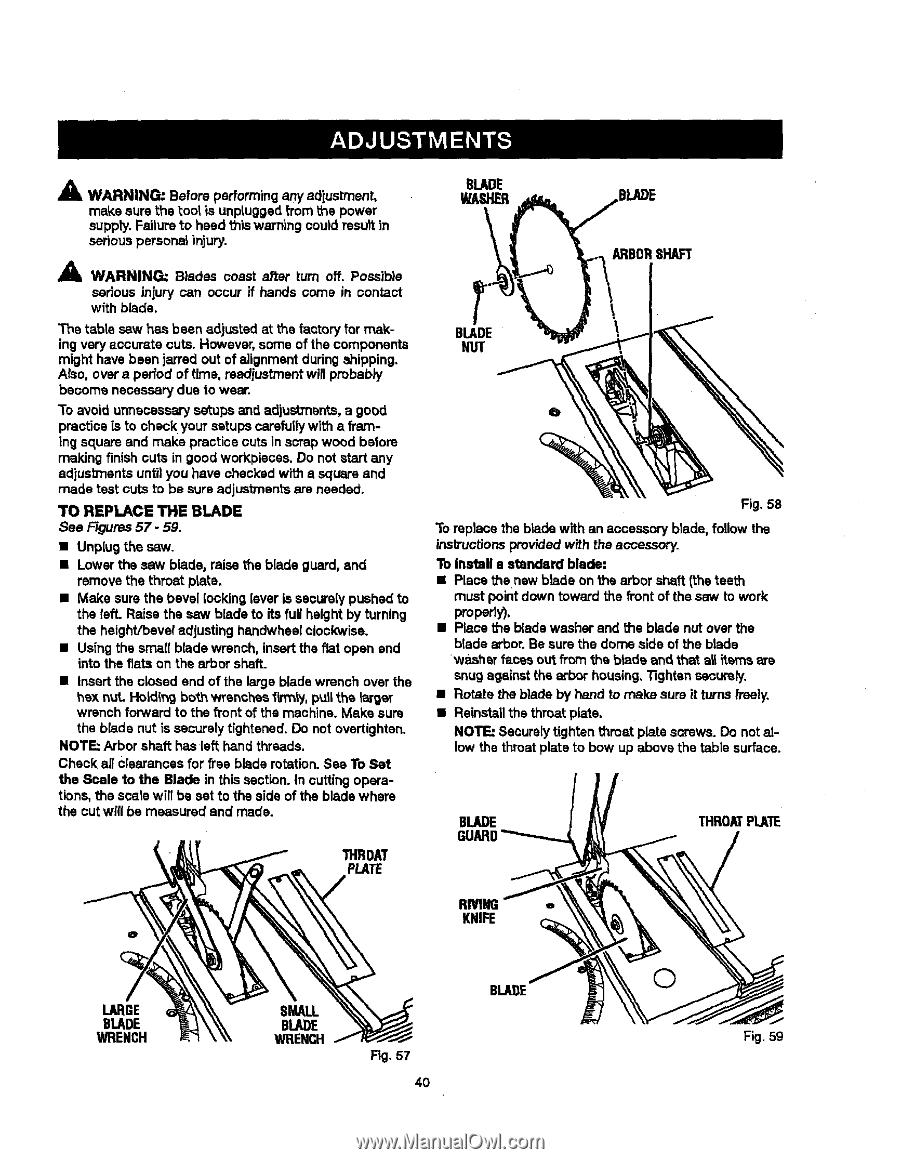
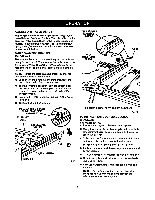
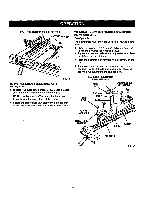
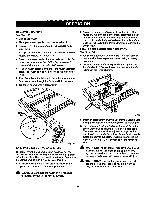
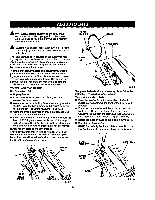
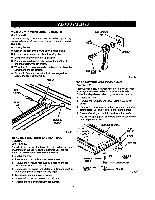
A WARNING." Before performing any adjustment, make sure the tool is unplugged from the power suppty. Failureto heed this waTn'lngcoutdresu)tin serious persona_injury. A WARNING: Blades coast after turn off. Possib}e serious injury can occur if hands come in contact with blade. The table sew has been adjusted at the factory for makingvery accurate cuts. However, some of the components might have been jarred out of alignmentduringshipping. ALso,over a period of t'rne, rsediustmentwill probably become necessary due to wear. 3"0avoid unnecessary setups and adjustmen*.sa, good practice is to check your setups carefullywith a framing square and make practice cuts in scrap wood before making finish cuts in good workpiaces. Do not start any adjustments until you have checked with a square and made test cuts to be sure adjustments are needed. TO REPLACE THE BLADE See Figures57 - 59. • Unplug the saw. • Lowerthe saw blade, raise the blade guard, and remove the throet plate. • Make sure the bevel lockinglever is securelypushed to the felt. Raise the sew bladeto its full height by turning the haight/beve_ adjusting handwheelclockwise. • Using the smallblade wrench, insertthe flat open and into the fiats on the arbor shaft. • Insertthe closed and of the largeblade wrench over the hax nut. Holding bo_.hwrenches li_nly, pull_.h_larger wrench forward to the f1"onot f the machine. Make sure the blade nut is securelytightened. De not overtighten. NOTE: Arbor shaft hasleft hand threads. Check allcrearancesfor free blade rotation. See To Set the Scale to the Blade in this section. In cutting operations, the scarewilt be set to the side of the blade where the cut will be measured and made. BLADE NUT Fig. 58 To replace the blade with an accessory blade, follow the instructionsprov'_ed with the accessory. To Inatall e standard blade: • Place thenew blade on the arbor shaft (the teeth must point down toward the fi'ontof the saw to work properly), • Place the blade washer and the blade nut over the blade arbor.Be sure the dome side of the blade washer f_cas ou_f.rom _a blade and that all items ere snugagainst the arbor housing,13ghtensecurely. • Rotate the blade by hand to make sure it turnsfreely. • Reinstallthe throat plate. NOTE: Seaurelytighten throat plate screws. Do not allow the throat plate to bow up above the table surface. BLADE THROATPLATE THROM PLATE RMNG KNIFE LARGE BLADE WRENCH SMALL BLADE WRENCH Fig. 57 40 BLAI)E © Fig. 59
-
 1
1 -
2
-
3
-
4
-
5
-
6
-
7
-
8
-
9
-
10
-
11
-
12
-
13
-
14
-
15
-
16
-
17
-
18
-
19
-
20
-
21
-
22
-
23
-
24
-
25
-
26
-
27
-
28
-
29
-
30
-
31
-
32
-
33
-
34
-
 35
35 -
 36
36 -
 37
37 -
 38
38 -
 39
39 -
 40
40 -
 41
41 -
 42
42 -
 43
43 -
 44
44 -
 45
45 -
46
-
47
-
48
-
49
-
50
-
51
-
52
-
53
-
54
-
55
-
56
-
57
-
58
 |
 |