Cub Cadet PRO Z 972S KW Operation Manual - Page 19
OIL CHART, Maintenance, Post-Operation Tractor Care
 |
View all Cub Cadet PRO Z 972S KW manuals
Add to My Manuals
Save this manual to your list of manuals |
Page 19 highlights
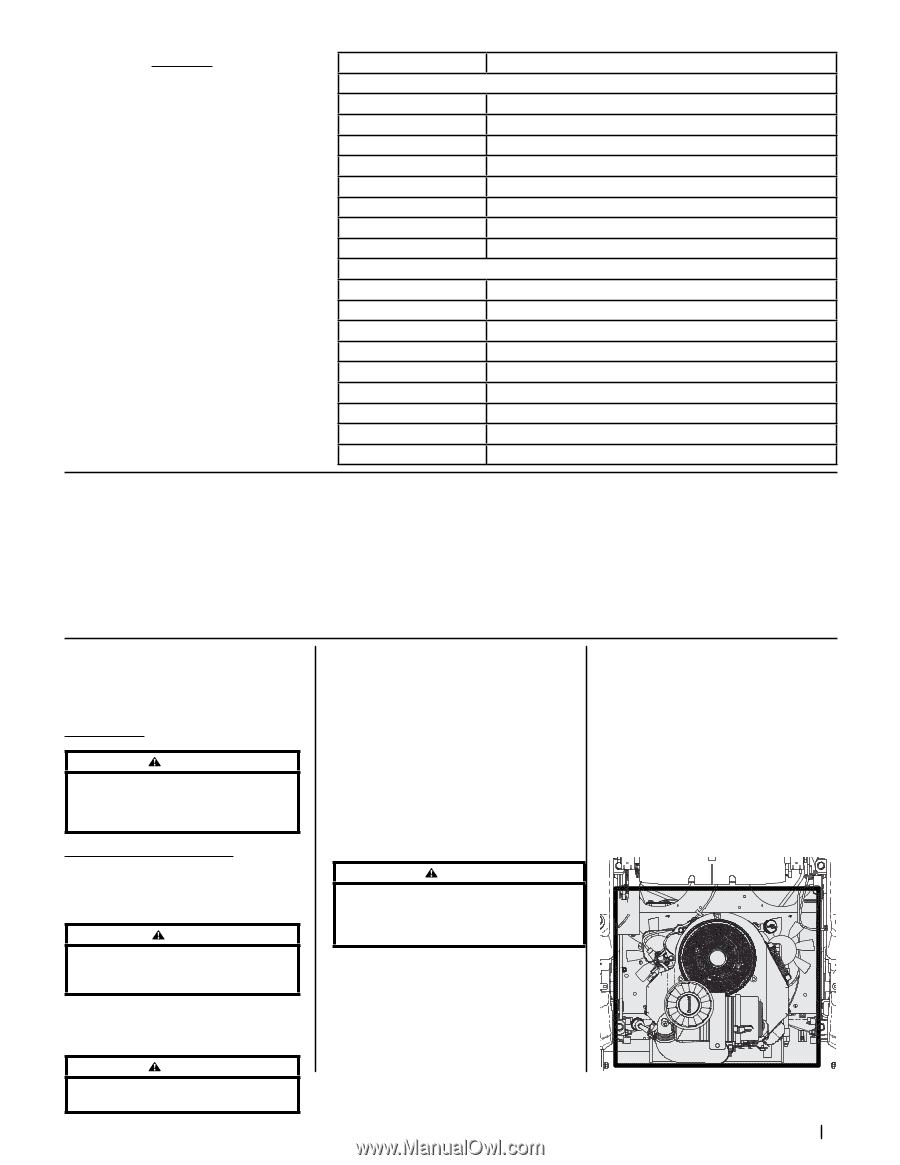
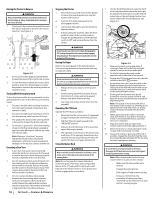
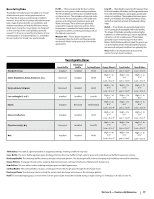
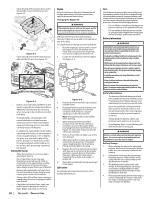
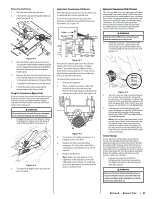
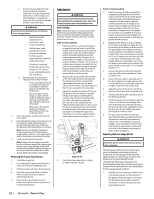
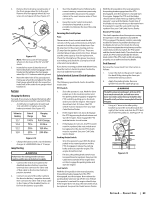
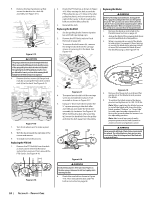
OIL CHART Apply a few drops of SAE engine oil, grease, or use a spray lubricant. Apply the oil to both sides of pivot points. Wipe off any excess. Start engine and operate mower briefly to insure that oil spreads evenly. Number of Oil Points 4 4 2 2 2 2 1 2 1 2 2 1 1 1 4 2 2 Description DAILY Deck Suspension Pivots Height Adjustment Turnbuckle Clevis Pin Height Adjustment Handle Pivots Height Adjustment Stop Pivots Deck Lift Linkage Pivots Transport Handle Pivots Transport Handle Pin Deck Frame Up-and-Down Pivots WEEKLY Seat Hinge Speed Control Linkage Rod End Bearings Pump Control Lever Pivots Brake Lever Pivot Clevis Pin Brake Lever Control Rod Pivot Brake Control Rod Swivel Joint Brake Rod Clevis Pins Brake Shaft Assembly Pivots Grass Collection System Lid Hinges (If Mower is so equipped) Engine Oil • Shell Rotella® T Triple Protection™ 15W40 • Shell Rimula® 15W40 • Reference your engine manual for other approved options Hydrostatic Fluid • Cub Drive System Fluid Plus (Shell TT-SB) • Castrol™ (Syntec®) Edge™ 5W50 General Purpose Lubrication: Use any NLGI grade 2 multi-purpose grease. Shell Albida EP2 is recommended. Shell Albida EP 2 is a red-colored multi-purpose grease designed for heavy-duty bearing applications. It has high base oil viscosity for mechanical stability, has been formulated for high load, low-speed applications, and has excellent lubrication and corrosion protection. Note: This Operator's Manual covers several models. Tractor features may vary by model. Not all features in this manual are applicable to all tractor models and the tractor depicted may differ from yours. Maintenance WARNING Before performing any maintenance or repairs, disengage the PTO, move the drive pedals to the neutral position engaging the parking brake, stop the engine and remove the key to prevent unintended starting. Post-Operation Tractor Care 1. Disengage the PTO, set the parking brake and stop the engine. 2. Use a hose to spray the underside of the deck. Note: Make sure that the hose is not routed under the deck and is clear of all moving parts. 3. After cleaning your deck, return to the operator's position and engage the PTO. Keep the deck running for a minimum of two minutes, allowing the underside of the deck to thoroughly dry. Cleaning the Tractor • Allow the machine to cool in an open area before cleaning. • Do not use water on any part of the tractor except the underside of the cutting deck. Doing so can cause damage to the tractor's spindle bearings, electrical system and engine, leading to premature failures. The use of compressed air and/or leaf blower will help keep the tractor clean. • Clean around the exhaust manifold, fuses, all wiring and harnesses, muffler pipe, muffler shield, engine intake screens and cooling fins, etc. See Figure 4-1. After each operation of the tractor, the following procedures should be implemented to extend the life of your tractor and ensure safe operating conditions. DANGER WARNING If the tractor has been recently run, the engine, muffler and surrounding metal surfaces will be hot and can cause burns to the skin. Let the engine cool for at least five minutes Exercise caution to avoid burns. Failure to follow these recommendations may result in serious injury to yourself or others and may cause damage to the tractor. Cleaning the Underside of the Deck Rinse grass clippings from the deck's underside and prevent the buildup of corrosive chemicals. WARNING Make certain the tractor's discharge chute is directed AWAY from people, your house, garage, parked cars, etc. Your tractor should be cleaned after each use and under certain conditions, i.e. dry conditions and/or mulching situations, additional cleaning may be necessary. One of the best ways to keep your tractor running efficiently and to reduce fire risk is to regularly remove debris buildup from the tractor. Follow the recommendations below and contact your authorized dealer with any questions. Figure 4-1 Section 4 - Product Care 19
-
 1
1 -
2
-
3
-
4
-
5
-
6
-
7
-
8
-
9
-
10
-
11
-
12
-
13
-
 14
14 -
 15
15 -
 16
16 -
 17
17 -
 18
18 -
 19
19 -
 20
20 -
 21
21 -
 22
22 -
 23
23 -
 24
24 -
25
-
26
-
27
-
28
-
29
-
30
-
31
-
32
 |
 |