Cuisinart AMW-90 User Manual - Page 8
Setup
 |
View all Cuisinart AMW-90 manuals
Add to My Manuals
Save this manual to your list of manuals |
Page 8 highlights
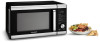
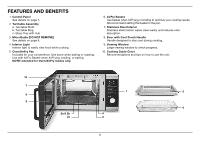
SETUP 1. Select a level surface with a minimum clearance of 12 inches (30cm) above the oven, at least 3 inches (8cm) between the oven, and any adjacent walls with one side open. NOTE: ° Blocking the intake and/or outlet openings can damage the oven. ° Objects should not be stored on the top of the oven. If they are, remove all objects before you turn on your oven. The exterior walls can get hot when in use. WARNING: DO NOT INSTALL THIS OVEN OVER A RANGE COOKTOP OR OTHER HEAT-PRODUCING APPLIANCE. IF IMPROPERLY INSTALLED NEAR OR OVER A HEAT SOURCE, THE OVEN COULD BE DAMAGED AND THE WARRANTY WOULD BE VOID. 3 inches (8cm) 12 inches (30cm) Open 3 inches (8cm) 2. Remove any protective film from oven. IMPORTANT: DO NOT REMOVE THE MICA COVER MICROGUIDE ATTACHED TO INTERIOR. IT SHIELDS AND PROTECTS WAVE ACTION. 3. Install turntable by setting ring assembly onto the oven floor, centered over the turntable shaft. Then place glass tray into the oven, carefully fitting the tray hub onto the turntable shaft. Turntable Ring Hub Glass Tray NOTE: Turntable assembly should always be in place during use. Make sure glass tray is never used upside down. Tray must be properly connected to the turntable ring before operating. If glass tray or turntable ring assembly breaks, do not use. Contact consumer service. 4. Plug oven into a standard household outlet, making sure the voltage and frequency are the same as those on the rating label. SETTING THE CLOCK The clock can be set when the oven is not cooking and the time (or 0:00) is displayed on the screen. To set the clock: 1. Press and hold the selector dial until and the clock hour flashes. 2. Turn the dial to set hour, then press selector dial to confirm setting. Minutes will flash. 3. Turn the dial to set minutes, then press selector dial to confirm setting. 8
-
 1
1 -
2
-
 3
3 -
 4
4 -
 5
5 -
 6
6 -
 7
7 -
 8
8 -
 9
9 -
 10
10 -
 11
11 -
 12
12 -
 13
13 -
14
-
15
-
16
-
17
-
18
-
19
-
20
-
21
-
22
-
23
-
24
-
25
-
26
-
27
-
28
-
29
-
30
-
31
-
32
-
33
-
34
-
35
-
36
-
37
-
38
-
39
-
40
-
41
-
42
-
43
-
44
 |
 |
