D-Link DCH-S161 User Manual - Page 11
Getting Started, Mounting the Water Sensor
 |
View all D-Link DCH-S161 manuals
Add to My Manuals
Save this manual to your list of manuals |
Page 11 highlights
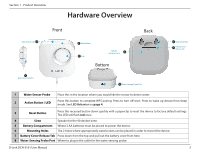
Section 2 - Installation Getting Started To mount your water on a wall, please follow the steps below. It is recommended that you configure the water sensor prior to mounting. Mounting the Water Sensor Step 1 Identify and mark the location where you want to install the bracket, ensuring that the water- 1 sensing probe cable length is long enough to reach the desired location where you want to detect the presence of water. Note: You can extend the cable length by using a 3.5 mm (0.125 in) stereo audio extension cable. Step 2 Using a 6 mm drill bit, drill two holes that are 2.5 cm deep over the marks. For a plaster, drywall, or 2 concrete wall, insert plastic anchors to support the screws first. Step 3 Twist the screws into the wall or anchors, making sure to leave enough clearance between the screw head and the wall. 3 D-Link DCH-S161 User Manual 8
-
 1
1 -
2
-
3
-
4
-
5
-
 6
6 -
 7
7 -
 8
8 -
 9
9 -
 10
10 -
 11
11 -
 12
12 -
 13
13 -
 14
14 -
 15
15 -
 16
16 -
17
-
18
-
19
-
20
-
21
-
22
-
23
-
24
-
25
-
26
-
27
-
28
-
29
-
30
-
31
-
32
-
33
-
34
-
35
-
36
-
37
-
38
-
39
-
40
-
41
-
42
-
43
-
44
 |
 |
