D-Link DCH-S161 User Manual - Page 6
Hardware Overview - us
 |
View all D-Link DCH-S161 manuals
Add to My Manuals
Save this manual to your list of manuals |
Page 6 highlights
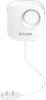
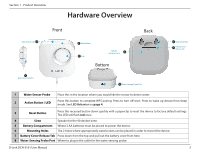
Section 1 - Product Overview Hardware Overview Front Back Action Button/LED 2 3 Reset Button 4 Siren Battery Compartment 5 Bottom 6 Mounting Holes 7 Battery Cover Release Tab 1 Water Sensor Probe 8 Water-Sensing Probe Port 1 Water Sensor Probe Place this in the location where you would like the sensor to detect water. 2 Action Button / LED Press this button to complete WPS pairing. Press to turn off siren. Press to wake up device from sleep mode. See LED Behavior on page 4. 3 Reset Button Press this recessed button down quickly with a paperclip to reset the device to factory default settings. The LED will flash red once. 4 Siren Speaker for the 90 decibel siren. 5 Battery Compartment Where 2 AA batteries must be placed to power the device. 6 Mounting Holes The 2 holes where appropriately-sized screws can be placed in order to mount the device. 7 Battery Cover Release Tab Press down from the top and pull out the battery cover from here. 8 Water-Sensing Probe Port Where to plug in the cable for the water-sensing probe. D-Link DCH-S161 User Manual 3
-
 1
1 -
 2
2 -
 3
3 -
 4
4 -
 5
5 -
 6
6 -
 7
7 -
 8
8 -
 9
9 -
 10
10 -
 11
11 -
 12
12 -
13
-
14
-
15
-
16
-
17
-
18
-
19
-
20
-
21
-
22
-
23
-
24
-
25
-
26
-
27
-
28
-
29
-
30
-
31
-
32
-
33
-
34
-
35
-
36
-
37
-
38
-
39
-
40
-
41
-
42
-
43
-
44
 |
 |
