D-Link DCH-S161 User Manual - Page 12
Step 5, D-Link DCH-S161 User Manual
 |
View all D-Link DCH-S161 manuals
Add to My Manuals
Save this manual to your list of manuals |
Page 12 highlights
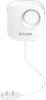
Section 2 - Installation Step 4 Align the screws with the largest holes on the back of the water sensor. Slide the sensor down 4 to lock it into place. Step 5 Assure that the water sensing probe is plugged in securely to the port on the bottom of main 5 sensor unit. Adjust the position as desired. D-Link DCH-S161 User Manual 9
-
 1
1 -
2
-
3
-
4
-
5
-
6
-
 7
7 -
 8
8 -
 9
9 -
 10
10 -
 11
11 -
 12
12 -
 13
13 -
 14
14 -
 15
15 -
 16
16 -
 17
17 -
18
-
19
-
20
-
21
-
22
-
23
-
24
-
25
-
26
-
27
-
28
-
29
-
30
-
31
-
32
-
33
-
34
-
35
-
36
-
37
-
38
-
39
-
40
-
41
-
42
-
43
-
44
 |
 |

9
D-Link DCH-S161 User Manual
Section 2 - Installation
Step 5
Assure that the water sensing probe is plugged in securely to the port on the bottom of main
sensor unit. Adjust the position as desired.
Step 4
Align the screws with the largest holes on the back of the water sensor. Slide the sensor down
to lock it into place.
5
4