D-Link DGL-4100 Product Manual - Page 32
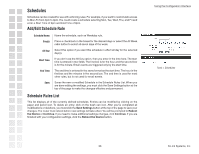
Inbound Filters, Add/Edit Inbound Filter Rule, Inbound Filter Rules List
 |
UPC - 790069272547
View all D-Link DGL-4100 manuals
Add to My Manuals
Save this manual to your list of manuals |
Page 32 highlights
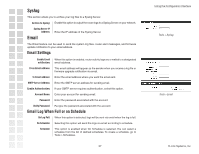
Inbound Filters The Inbound Filters option is an advanced method of controlling data received from the Internet. With this feature you can configure inbound data filtering rules that control data based on IP Address, Protocol, and/or Port. The Inbound Filter option is best suited for custom applications. For most applications you should use Virtual Server, Special Applications, or the Gaming section to create rules that will allow applications to communicate through the router. Add/Edit Inbound Filter Rule Enable: Enables inbound filtering. Name: Enter a name for the rule that is meaningful to you. Action: The rule can be set to either allow or deny applicable messages. Source IP Range: Defines the range of Internet addresses this rule applies to. Protocol: Select the protocol used for this rule. Source Port Range: Enter the range of ports that this rule applies to. Public Port Range: Enter the range of WAN side ports associated with the servers on the LAN that this rule applies to. Schedule: Select a schedule for the times when this rule should be in effect. If you do not see the schedule you need in the list of schedules, go to the Tools > Schedules screen and create a new schedule. Log: Check this option if you want the router to add an entry to the log whenever a rule is enforced. Save: Saves the new rule or modified existing rule to the Rules list. When you are done editing the settings, you must click the Save Settings button at the top of the page to make the changes effective and permanent. Inbound Filter Rules List This section lists the current Inbound Filter rules. Entries can be modified by clicking on the paper and pencil icon.To delete an entry, click on the trash can icon. After you've completed all modifications or deletions, you must click the Save Settings button at the top of the page to save your changes. The router must reboot before new settings will take effect. You will be prompted to Reboot the Device or Continue. If you need to make additional settings changes, click Continue. If you are finished with your configuration settings, click the Reboot the Device button. 32 Using the Configuration Interface Advanced > Inbound Filters D-Link Systems, Inc.
-
 1
1 -
2
-
3
-
4
-
5
-
6
-
7
-
8
-
9
-
10
-
11
-
12
-
13
-
14
-
15
-
16
-
17
-
18
-
19
-
20
-
21
-
22
-
23
-
24
-
25
-
26
-
 27
27 -
 28
28 -
 29
29 -
 30
30 -
 31
31 -
 32
32 -
 33
33 -
 34
34 -
 35
35 -
 36
36 -
 37
37 -
38
-
39
-
40
-
41
-
42
-
43
-
44
-
45
-
46
-
47
-
48
-
49
-
50
-
51
-
52
-
53
-
54
-
55
-
56
-
57
-
58
-
59
-
60
-
61
-
62
 |
 |
