D-Link DGL-4100 Product Manual - Page 36
Schedules, Add/Edit Schedule Rule, Schedule Rules List
 |
UPC - 790069272547
View all D-Link DGL-4100 manuals
Add to My Manuals
Save this manual to your list of manuals |
Page 36 highlights
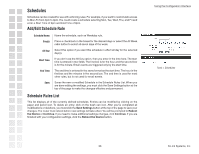
Schedules Schedules can be created for use with enforcing rules. For example, if you want to restrict web access to Mon-Fri from 3pm to 8pm. You could create a schedule selecting Mon, Tue, Wed, Thu, and Fri and enter a Start Time of 3pm and End Time of 8pm. Add/Edit Schedule Rule Schedule Name: Day(s): All Day: Start Time: End Time: Save: Name the schedule, such as Weekday rule. Place a checkmark in the boxes for the desired days or select the All Week radio button to select all seven days of the week. Select this option if you want this schedule in effect all day for the selected day(s). If you don't use the All Day option, then you enter in the time here. The start time is entered in two fields. The first box is for the hour and the second box is for the minute. Email events are triggered only by the start time. The end time is entered in the same format as the start time. The hour in the first box and the minutes in the second box. The end time is used for most other rules, but is not used for email events. Saves the new or modified Schedule in the Schedule Rules List. When you are done editing the settings, you must click the Save Settings button at the top of the page to make the changes effective and permanent. Schedule Rules List This list displays all of the currently defined schedules. Entries can be modified by clicking on the paper and pencil icon. To delete an entry, click on the trash can icon. After you've completed all modifications or deletions, you must click the Save Settings button at the top of the page to save your changes. The router must reboot before new settings will take effect. You will be prompted to Reboot the Device or Continue. If you need to make additional settings changes, click Continue. If you are finished with your configuration settings, click the Reboot the Device button. Using the Configuration Interface Tools > Schedules 36 D-Link Systems, Inc.
-
 1
1 -
2
-
3
-
4
-
5
-
6
-
7
-
8
-
9
-
10
-
11
-
12
-
13
-
14
-
15
-
16
-
17
-
18
-
19
-
20
-
21
-
22
-
23
-
24
-
25
-
26
-
27
-
28
-
29
-
30
-
 31
31 -
 32
32 -
 33
33 -
 34
34 -
 35
35 -
 36
36 -
 37
37 -
 38
38 -
 39
39 -
 40
40 -
 41
41 -
42
-
43
-
44
-
45
-
46
-
47
-
48
-
49
-
50
-
51
-
52
-
53
-
54
-
55
-
56
-
57
-
58
-
59
-
60
-
61
-
62
 |
 |
