D-Link DGS-1224T Product Manual - Page 26
Identifying the Web-based Management Utility, Tool Menu, Reset, Main Configuration Screen - d link default ip
 |
UPC - 790069264467
View all D-Link DGS-1224T manuals
Add to My Manuals
Save this manual to your list of manuals |
Page 26 highlights
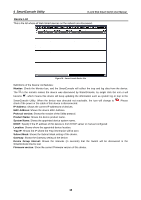
5 Configuration D-Link Web Smart Switch User Manual Identifying the Web-based Management Utility After clicking the Exit button in Smart Wizard you will see the screen below: Figure 33 - Web-based Management Utility This is the Web-based Management Utility. Here you will see a Tools menu bar on top, a Function Tree, and the Main Configuration Screen. In the Tools menu, you can Reset, Config Backup and Restore, Firmware Backup and Upload, and System Reboot. Next to the Tools menu is the Smart Wizard button. By clicking this you can return to the Smart Wizard if you wish to make any changes there. By choosing different functions in the function tree, you can change all the configurations in the Main Configuration Screen. The main configuration screen will show the current status of your Switch by clicking the model name on top of the function tree. At the upper right of the screen you can see your username and current IP address. Under your username is the Logout button. Click this to end this session. Finally, by clicking on the D-Link logo at the upper left of the screen you will be linked to the official D-Link website. For learn the further information to configuring the D-Link Web Smart Switch via Web-based Management Utility, please check the "Configuration" section. Tool Menu The Tool Menu offers global function controls such as Reset, Configuring Backup and Restoration, Firmware Backup and Upload, and System Reboot. Figure 34 - Tool Menu Reset Provide a safe reset option for the Switch. All configurations will be reset to default. Click Factory Reset to restore the settings to default values. Figure 35 - Tool Menu > Reset 22
-
 1
1 -
2
-
3
-
4
-
5
-
6
-
7
-
8
-
9
-
10
-
11
-
12
-
13
-
14
-
15
-
16
-
17
-
18
-
19
-
20
-
 21
21 -
 22
22 -
 23
23 -
 24
24 -
 25
25 -
 26
26 -
 27
27 -
 28
28 -
 29
29 -
 30
30 -
 31
31 -
32
-
33
-
34
-
35
-
36
-
37
-
38
-
39
-
40
-
41
-
42
-
43
-
44
-
45
-
46
-
47
-
48
-
49
-
50
-
51
-
52
 |
 |
