D-Link DKVM-16 Manual - Page 7
Continued, Step 1, WARNING - cable
 |
UPC - 790069254987
View all D-Link DKVM-16 manuals
Add to My Manuals
Save this manual to your list of manuals |
Page 7 highlights
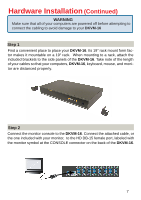
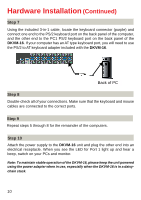
Hardware Installation (Continued) WARNING Make sure that all of your computers are powered off before attempting to connect the cabling to avoid damage to your DKVM-16 Step 1 Find a convenient place to place your DKVM-16. Its 19" rack mount form factor makes it mountable on a 19" rack. When mounting to a rack, attach the included brackets to the side panels of the DKVM-16. Take note of the length of your cables so that your computers, DKVM-16, keyboard, mouse, and monitor are distanced properly. Step 2 Connect the monitor console to the DKVM-16. Connect the attached cable, or the one included with your monitor, to the HD DB-15 female port, labeled with the monitor symbol at the CONSOLE connector on the back of the DKVM-16. 7
-
 1
1 -
 2
2 -
 3
3 -
 4
4 -
 5
5 -
 6
6 -
 7
7 -
 8
8 -
 9
9 -
 10
10 -
 11
11 -
 12
12 -
13
-
14
-
15
-
16
-
17
-
18
-
19
-
20
-
21
-
22
-
23
-
24
-
25
-
26
-
27
-
28
-
29
-
30
 |
 |

7
Hardware Installation
(Continued)
Find a convenient place to place your
DKVM-16
. Its 19" rack mount form fac-
tor makes it mountable on a 19" rack.
When mounting to a rack, attach the
included brackets to the side panels of the
DKVM-16
. Take note of the length
of your cables so that your computers,
DKVM-16
, keyboard, mouse, and moni-
tor are distanced properly.
Connect the monitor console to the
DKVM-16
. Connect the attached cable, or
the one included with your monitor,
to the HD DB-15 female port, labeled with
the monitor symbol at the CONSOLE connector on the back of the
DKVM-16
.
Step 1
Step 2
WARNING
Make sure that all of your computers are powered off before attempting to
connect the cabling to avoid damage to your
DKVM-16