D-Link DNS-120 Product Manual - Page 9
Hardware Installation - d link manual
 |
UPC - 790069270666
View all D-Link DNS-120 manuals
Add to My Manuals
Save this manual to your list of manuals |
Page 9 highlights
DNS-120 User's Manual Hardware Installation Hardware Installation 1 Attach the provided Ethernet cable to the Ethernet port on the rear panel. 2 Attach the other end of the Ethernet cable to an available Ethernet port on your router or switch. 3 Plug the AC adapter into the receptor located on the back of the device. Plug the other end of the AC Adapter into a power strip or wall outlet. 4 Attach your USB drive(s) to the USB port(s) on the rear panel of the DNS-120. The USB LED on the front panel will blink until the drive has been installed. Once the USB LED is solid green, your USB drive is ready for use. D-Link Systems, Inc. 9
-
 1
1 -
2
-
3
-
 4
4 -
 5
5 -
 6
6 -
 7
7 -
 8
8 -
 9
9 -
 10
10 -
 11
11 -
 12
12 -
 13
13 -
 14
14 -
15
-
16
-
17
-
18
-
19
-
20
-
21
-
22
-
23
-
24
-
25
-
26
-
27
-
28
-
29
-
30
-
31
-
32
-
33
-
34
-
35
-
36
-
37
-
38
-
39
-
40
-
41
-
42
-
43
-
44
-
45
-
46
-
47
-
48
-
49
-
50
 |
 |

9
DNS-120 User’s Manual
D-Link Systems, Inc.
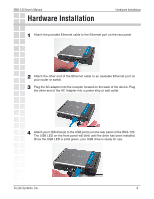
Hardware Installation
Attach the provided Ethernet cable to the Ethernet port on the rear panel.
1
Attach the other end of the Ethernet cable to an available Ethernet port on
your router or switch.
2
Plug the AC adapter into the receptor located on the back of the device. Plug
the other end of the AC Adapter into a power strip or wall outlet.
3
Attach your USB drive(s) to the USB port(s) on the rear panel of the DNS-120.
The USB LED on the front panel will blink until the drive has been installed.
Once the USB LED is solid green, your USB drive is ready for use.
4
Hardware Installation