DeLonghi ECAM23210SB Owner Manual - Page 9
Heating Water, Cleaning - superautomatic coffee machine
 |
View all DeLonghi ECAM23210SB manuals
Add to My Manuals
Save this manual to your list of manuals |
Page 9 highlights
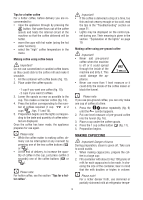
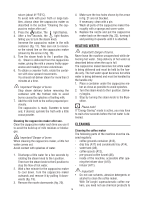
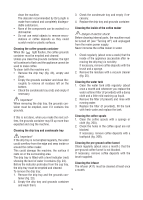
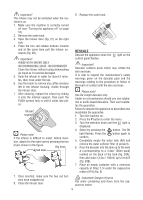
rature (about 41°F/5°C). To avoid milk with poor froth or large bubbles, always clean the cappuccino maker as described in the section "Cleaning the cappuccino maker after use". 3. Press the button. The light flashes. 4. After a few seconds, the light flashes telling you to turn the steam knob. Immerse the cappuccino maker in the milk container (fig. 17). Take care not to immerse the raised line on the cappuccino maker (shown by the arrow in fig. 18). 5. Turn the steam knob to the I position (fig. 4) . Steam is delivered from the cappuccino maker, giving the milk a creamy frothy appearance and making it more voluminous. 6. To obtain a creamier froth, rotate the container with slow upward movements. You should not deliver steam for more than 3 minutes at a time. Important! Danger of burns Stop steam delivery before removing the container with the frothed milk to avoid burns caused by splashes of boiling milk. 7. Add the milk froth to the coffee prepared previously. The cappuccino is ready. Sweeten to taste and, if desired, sprinkle the froth with a little cocoa powder. 4. Make sure the two holes shown by the arrow in fig. 21 are not blocked. If necessary, clean with a pin. 5. Wash all parts of the cappuccino maker thoroughly with a sponge and warm water. 6. Replace the nozzle and put the cappuccino maker back on the nozzle (fig. 22), turning it and pushing it upwards until it is attached. HEATING WATER Important! Danger of burns. Never leave the machine unsupervised while delivering hot water. Stop delivery of hot water as described below when the cup is full. The cappuccino maker becomes hot while water is being delivered and must be held by the handle only. The hot water spout becomes hot while water is being delivered and must be handled by the handle only. 1. Place a container under the cappuccino ma- ker as close as possible to avoid splashes. 2. Turn the steam knob to the I position. Delive- ry begins. 3. Stop by turning the steam knob to the 0 po- sition. Please note! If "Energy Saving" mode is active, you may have to wait a few seconds before the hot water is delivered. Cleaning the cappuccino maker after use. Clean the cappuccino maker each time you use it to avoid the build-up of milk residues or blockages. Important! Danger of burns When cleaning the cappuccino maker, a little hot water comes out. Avoid contact with splashes of water. 1. Discharge a little water for a few seconds by rotating the steam knob to the I position. Then turn the steam knob to the 0 position to stop the flow of hot water. 2. Wait a few minute for the cappuccino maker to cool down. Turn the cappuccino maker outwards and remove it by pulling it downwards (fig. 19). 3. Remove the nozzle downwards (fig. 20). CLEANING Cleaning the coffee maker The following parts of the machine must be cleaned regularly: - coffee grounds container (A13), - drip tray (A17) and condensate tray (A14), - water tank (A9), - coffee spouts (A12), - pre-ground coffee funnel (A6), - inside of the machine, accessible after ope- ning the infuser door (A10), - infuser (A11). Important! • Do not use solvents, abrasive detergents or alcohol to clean the coffee maker. With De'Longhi superautomatic coffee makers, you need not use chemical products to 14
-
 1
1 -
2
-
3
-
 4
4 -
 5
5 -
 6
6 -
 7
7 -
 8
8 -
 9
9 -
 10
10 -
 11
11 -
 12
12 -
 13
13 -
 14
14 -
15
-
16
-
17
 |
 |