Dell 1209S User Guide - Page 20
Auto Adjust, Press to select the On Screen Display OSD - projector lamp
 |
View all Dell 1209S manuals
Add to My Manuals
Save this manual to your list of manuals |
Page 20 highlights
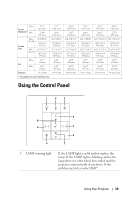
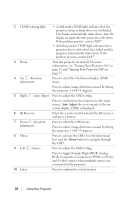
2 TEMP warning light • A solid amber TEMP light indicates that the projector, lamp, or lamp driver are overheated. The display automatically shuts down. Turn the display on again after the projector cools down. If the problem persists, contact Dell™. • A blinking amber TEMP light indicates that a projector fan or color wheel have failed and the projector automatically shuts down. If the problem persists, contact Dell™. 3 Power Turn the projector on and off. For more information, see "Turning Your Projector On" on page 15 and "Turning Your Projector Off" on page 15. 4 Up / Keystone adjustment Press to select the On Screen Display (OSD) items. Press to adjust image distortion caused by tilting the projector. (+40/-35 degrees) 5 Right / Auto Adjust Press to adjust the OSD setting. Press to synchronize the projector to the input source. Auto Adjust does not operate if the onscreen display (OSD) is displayed. 6 IR Receiver Point the remote control towards the IR receiver and press a button. 7 Down / Keystone adjustment Press to select the OSD items. Press to adjust image distortion caused by tilting the projector. (+40/-35 degrees) 8 Menu Press to activate the OSD. Use the directional keys and the Menu button to navigate through the OSD. 9 Left / Source Press to adjust the OSD setting. Press to toggle through Digital RGB, Analog RGB, Composite, Component (YPbPr via VGA), and S-video sources when multiple sources are connected to the projector. 10 Enter Press to confirm the selection item. 20 Using Your Projector
-
 1
1 -
2
-
3
-
4
-
5
-
6
-
7
-
8
-
9
-
10
-
11
-
12
-
13
-
14
-
 15
15 -
 16
16 -
 17
17 -
 18
18 -
 19
19 -
 20
20 -
 21
21 -
 22
22 -
 23
23 -
 24
24 -
 25
25 -
26
-
27
-
28
-
29
-
30
-
31
-
32
-
33
-
34
-
35
-
36
-
37
-
38
-
39
-
40
-
41
-
42
-
43
-
44
-
45
-
46
-
47
-
48
-
49
 |
 |