Dell 1610HD User Guide - Page 43
Captured, Enter, B, HDMI and Microphone. - audio out
 |
UPC - 884116026426
View all Dell 1610HD manuals
Add to My Manuals
Save this manual to your list of manuals |
Page 43 highlights
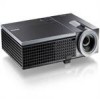
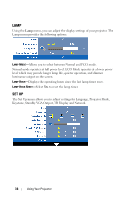
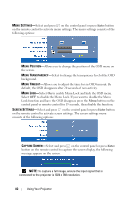
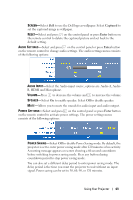
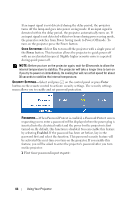
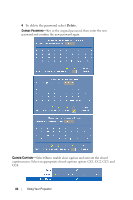
SCREEN-Select Dell to use the Dell logo as wallpaper. Select Captured to set the captured image as wallpaper. RESET-Select and press on the control panel or press Enter button on the remote control to delete the captured picture and set back to the default setting. AUDIO SETTINGS-Select and press on the control panel or press Enter button on the remote control to change audio settings. The audio settings menu consists of the following options: AUDIO INPUT-Select the Audio input source, options are: Audio-A, AudioB, HDMI and Microphone. VOLUME-Press to decrease the volume and to increase the volume. SPEAKER-Select On to enable speaker. Select Off to disable speaker. MUTE-Allows you to mute the sounds for audio input and audio output. POWER SETTINGS-Select and press on the control panel or press Enter button on the remote control to activate power settings. The power settings menu consists of the following options: POWER SAVING-Select Off to disable Power Saving mode. By default, the projector is set to enter power saving mode after 120 minutes of no activity. A warning message appears on screen showing a 60-second countdown before switching to power saving mode. Press any button during countdown period to stop power saving mode. You can also set a different delay period to enter power saving mode. The delay period is the time you want the projector to wait without an input signal. Power saving can be set to 30, 60, 90, or 120 minutes. Using Your Projector 43
-
 1
1 -
2
-
3
-
4
-
5
-
6
-
7
-
8
-
9
-
10
-
11
-
12
-
13
-
14
-
15
-
16
-
17
-
18
-
19
-
20
-
21
-
22
-
23
-
24
-
25
-
26
-
27
-
28
-
29
-
30
-
31
-
32
-
33
-
34
-
35
-
36
-
37
-
 38
38 -
 39
39 -
 40
40 -
 41
41 -
 42
42 -
 43
43 -
 44
44 -
 45
45 -
 46
46 -
 47
47 -
 48
48 -
49
-
50
-
51
-
52
-
53
-
54
-
55
-
56
-
57
-
58
-
59
-
60
-
61
-
62
-
63
-
64
-
65
-
66
-
67
-
68
-
69
-
70
-
71
-
72
-
73
-
74
-
75
-
76
-
77
-
78
-
79
-
80
 |
 |