Dell 2350D User Guide - Page 104
Cleaning the Exterior of the Printer, NOTICE, CAUTION
 |
View all Dell 2350D manuals
Add to My Manuals
Save this manual to your list of manuals |
Page 104 highlights
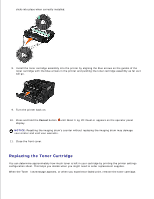
NOTICE: When replacing a toner cartridge assembly, do not leave the new cartridge exposed to direct light for an extended period of time. Extended light exposure can cause print quality problems. 5. Rotate the cartridge in all directions to distribute the toner. 6. Install the new toner cartridge assembly by aligning the white rollers on the toner cartridge with the arrows on the tracks of the imaging drum kit and pushing the toner cartridge in as far as it will go. The cartridge clicks into place when correctly installed. 7. Close the front cover. Cleaning the Exterior of the Printer 1. Make sure that the printer is turned off and unplugged from the wall outlet. CAUTION: To avoid the risk of electric shock, unplug the power cord from the wall outlet and disconnect all cables to the printer before proceeding. 2. Remove paper from the paper support and paper exit tray. 3.
-
 1
1 -
2
-
3
-
4
-
5
-
6
-
7
-
8
-
9
-
10
-
11
-
12
-
13
-
14
-
15
-
16
-
17
-
18
-
19
-
20
-
21
-
22
-
23
-
24
-
25
-
26
-
27
-
28
-
29
-
30
-
31
-
32
-
33
-
34
-
35
-
36
-
37
-
38
-
39
-
40
-
41
-
42
-
43
-
44
-
45
-
46
-
47
-
48
-
49
-
50
-
51
-
52
-
53
-
54
-
55
-
56
-
57
-
58
-
59
-
60
-
61
-
62
-
63
-
64
-
65
-
66
-
67
-
68
-
69
-
70
-
71
-
72
-
73
-
74
-
75
-
76
-
77
-
78
-
79
-
80
-
81
-
82
-
83
-
84
-
85
-
86
-
87
-
88
-
89
-
90
-
91
-
92
-
93
-
94
-
95
-
96
-
97
-
98
-
 99
99 -
 100
100 -
 101
101 -
 102
102 -
 103
103 -
 104
104 -
 105
105 -
 106
106 -
 107
107 -
 108
108 -
 109
109 -
110
-
111
-
112
-
113
-
114
-
115
-
116
-
117
-
118
-
119
-
120
-
121
-
122
-
123
-
124
-
125
-
126
-
127
-
128
-
129
-
130
-
131
-
132
-
133
-
134
-
135
-
136
-
137
-
138
-
139
-
140
-
141
-
142
-
143
-
144
-
145
-
146
-
147
-
148
-
149
-
150
-
151
-
152
-
153
-
154
-
155
-
156
-
157
-
158
-
159
-
160
-
161
-
162
-
163
-
164
-
165
-
166
-
167
-
168
-
169
-
170
-
171
-
172
-
173
-
174
-
175
-
176
-
177
-
178
-
179
-
180
-
181
 |
 |
