Dell 32 Curved Gaming S3222HG S3222HG Monitor Users Guide - Page 22
Setting up the monitor, Connecting the stand
 |
View all Dell 32 Curved Gaming S3222HG manuals
Add to My Manuals
Save this manual to your list of manuals |
Page 22 highlights
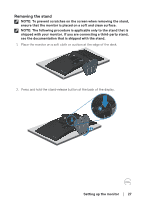
Setting up the monitor Connecting the stand NOTE: The stand is detached when the monitor is shipped from the factory. NOTE: The following procedure is applicable to the stand that is shipped with your monitor. If you are connecting a third-party stand, see the documentation that is shipped with the stand. 1. Follow the instructions on the flaps of packaging box to remove the stand from the top cushion that secures it. 2. Connect the stand base to the stand riser. 3. Open the screw handle on the stand base and tighten the screw to secure the stand riser to the stand base. 4. Close the screw handle. 1 2 3 4 5. Slide the tabs on the stand assembly into the slots on the monitor and press the stand assembly down to snap it into place. 5 22 │ Setting up the monitor
-
 1
1 -
2
-
3
-
4
-
5
-
6
-
7
-
8
-
9
-
10
-
11
-
12
-
13
-
14
-
15
-
16
-
 17
17 -
 18
18 -
 19
19 -
 20
20 -
 21
21 -
 22
22 -
 23
23 -
 24
24 -
 25
25 -
 26
26 -
 27
27 -
28
-
29
-
30
-
31
-
32
-
33
-
34
-
35
-
36
-
37
-
38
-
39
-
40
-
41
-
42
-
43
-
44
-
45
-
46
-
47
-
48
-
49
-
50
-
51
-
52
-
53
-
54
-
55
-
56
-
57
-
58
-
59
-
60
 |
 |
