Dell 7609WU User's Guide - Page 41
Audio Audio In, DisplayPort, Enter, Customized Screen, My Customized logo, Dell Logo, OSD Timeout
 |
UPC - 884116009658
View all Dell 7609WU manuals
Add to My Manuals
Save this manual to your list of manuals |
Page 41 highlights
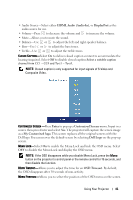
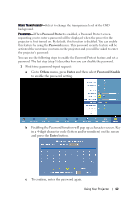
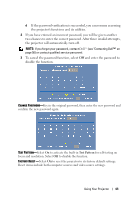
• Audio Source-Select either HDMI, Audio (Audio In), or DisplayPort as the audio source for use. • Volume-Press to decrease the volume and to increase the volume. • Mute-Allows you to mute the sound. • Balance-Use or to adjust the left and right speaker balance. • Bass-Use or to adjust the bass tones. • Treble-Use or to adjust the treble tones. CLOSED CAPTION-Select On to deliver closed caption content to accommodate the hearing-impaired. Select Off to disable closed caption.Select a suitable caption channel from CC1 ~ CC4 and Text1 ~ Text4. NOTE: Closed caption is only supported for input signals of S-Video and Composite Video. CUSTOMIZED SCREEN -Press Enter to pop up a Customized Screen menu. Input in a source then press Enter and select Yes. The projector will capture the screen image as a My Customized logo. This screen replaces all the original screens with the Dell logo. You can recover the default screen by selecting Dell Logo on the pop-up screen. MENU LOCK-Select On to enable the Menu Lock and hide the OSD menu. Select OFF to disable the Menu Lock and display the OSD menu. NOTE: If the OSD disappears while you disable Menu Lock, press the Menu button on the projector's control panel or the remote control for 15 seconds, and then disable the function. MENU TIMEOUT-Allows you to adjust the time for an OSD Timeout. By default, the OSD disappears after 30 seconds of non-activity. MENU POSITION-Allows you to select the position of the OSD menu on the screen. Using Your Projector 41
-
 1
1 -
2
-
3
-
4
-
5
-
6
-
7
-
8
-
9
-
10
-
11
-
12
-
13
-
14
-
15
-
16
-
17
-
18
-
19
-
20
-
21
-
22
-
23
-
24
-
25
-
26
-
27
-
28
-
29
-
30
-
31
-
32
-
33
-
34
-
35
-
 36
36 -
 37
37 -
 38
38 -
 39
39 -
 40
40 -
 41
41 -
 42
42 -
 43
43 -
 44
44 -
 45
45 -
 46
46 -
47
-
48
-
49
-
50
-
51
-
52
-
53
-
54
-
55
-
56
-
57
-
58
-
59
-
60
-
61
-
62
 |
 |
