Dell 926 User's Guide - Page 50
Sending a Scheduled Fax, Con Cover Preview, Change, Browse, Use cover template
 |
UPC - 028000141776
View all Dell 926 manuals
Add to My Manuals
Save this manual to your list of manuals |
Page 50 highlights
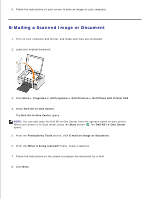
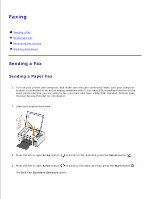
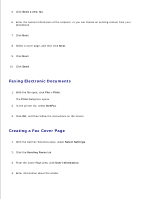
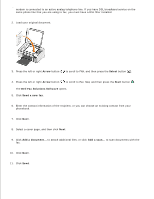
4. NOTE: You may have already specified this information when you used the Dell Fax Solutions for the first time. 5. Click OK. 6. From the Cover Page area, click Configure Cover Page. 7. Click Next or Preview to choose a template for your cover page. 8. Add a company logo, if necessary. a. Click Change. b. Click Browse. c. Browse for an image of your company logo, and click Open. d. Adjust your logo, if necessary. e. Click OK. 9. Click OK. When sending a fax, make sure you select Use cover page template to use the cover page you have just created. For more information, see Sending a Fax. Sending a Scheduled Fax 1. Turn on your printer and computer, and make sure they are connected. Make sure your computer modem is connected to an active analog telephone line. If you have DSL broadband service on the same phone line that you are using to fax, you must have a DSL filter installed. 2. Load your original document.
-
 1
1 -
2
-
3
-
4
-
5
-
6
-
7
-
8
-
9
-
10
-
11
-
12
-
13
-
14
-
15
-
16
-
17
-
18
-
19
-
20
-
21
-
22
-
23
-
24
-
25
-
26
-
27
-
28
-
29
-
30
-
31
-
32
-
33
-
34
-
35
-
36
-
37
-
38
-
39
-
40
-
41
-
42
-
43
-
44
-
 45
45 -
 46
46 -
 47
47 -
 48
48 -
 49
49 -
 50
50 -
 51
51 -
 52
52 -
 53
53 -
 54
54 -
 55
55 -
56
-
57
-
58
-
59
-
60
-
61
-
62
-
63
-
64
-
65
-
66
-
67
-
68
-
69
-
70
-
71
-
72
-
73
-
74
-
75
-
76
-
77
-
78
-
79
-
80
-
81
-
82
-
83
-
84
-
85
-
86
-
87
-
88
-
89
-
90
-
91
-
92
-
93
-
94
-
95
-
96
-
97
-
98
-
99
-
100
-
101
-
102
-
103
-
104
-
105
-
106
-
107
-
108
 |
 |
