Dell 946 User Guide - Page 7
Setting Up Your Printer, Understanding the Operator Panel, Initial Setup Menu - scan
 |
View all Dell 946 manuals
Add to My Manuals
Save this manual to your list of manuals |
Page 7 highlights
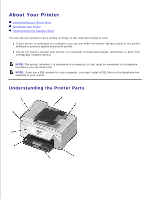
Setting Up Your Printer NOTE: Your printer supports Microsoft® Windows® 2000, Windows XP, and Windows XP Professional X64 Edition. To set up your printer, follow the steps on your Setting Up Your Printer poster. If you encounter problems during setup, see Troubleshooting. NOTE: Your printer modem is an analog device that only works when directly connected to a wall jack. Other devices such as a telephone or answering machine can be attached to the PHONE jack connector ( - right side connector) to pass through the printer as described in the setup steps. If you have a digital connection such as ISDN, DSL, or ADSL, a digital line filter is required. Contact your Internet Service Provider for details. Initial Setup Menu The printer automatically cycles through initial setup the first time you power on the printer. Initial setup consists of specifying the language, country, date, time, fax number, and fax name. If necessary, you can change the settings for language, country, date, time, fax number, and fax name by accessing the Setup menu. For more information, see Setup Mode. Understanding the Operator Panel Using the Operator Panel The operator panel buttons allow you to copy documents and photos, fax documents, and print photos from a PictBridge-enabled camera without connecting to a computer. The printer is on when Power is illuminated. You can change settings using the Select button , and left and right Arrow buttons ; and initiate a scan, copy, or fax using the Start button . The display features: Printer status Messages Menus
-
 1
1 -
 2
2 -
 3
3 -
 4
4 -
 5
5 -
 6
6 -
 7
7 -
 8
8 -
 9
9 -
 10
10 -
 11
11 -
 12
12 -
13
-
14
-
15
-
16
-
17
-
18
-
19
-
20
-
21
-
22
-
23
-
24
-
25
-
26
-
27
-
28
-
29
-
30
-
31
-
32
-
33
-
34
-
35
-
36
-
37
-
38
-
39
-
40
-
41
-
42
-
43
-
44
-
45
-
46
-
47
-
48
-
49
-
50
-
51
-
52
-
53
-
54
-
55
-
56
-
57
-
58
-
59
-
60
-
61
-
62
-
63
-
64
-
65
-
66
-
67
-
68
-
69
-
70
-
71
-
72
-
73
-
74
-
75
-
76
-
77
-
78
-
79
-
80
-
81
-
82
-
83
-
84
-
85
-
86
-
87
-
88
-
89
-
90
-
91
-
92
-
93
-
94
-
95
-
96
-
97
-
98
-
99
-
100
-
101
 |
 |
