Dell B1265dnf Mono Laser User Manual - Page 173
Canceling a reserved fax job, Sending a priority fax, Forwarding a sent, fax to another destination
 |
View all Dell B1265dnf Mono Laser manuals
Add to My Manuals
Save this manual to your list of manuals |
Page 173 highlights
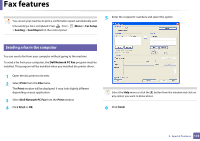
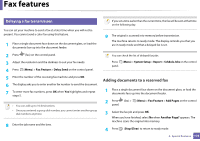
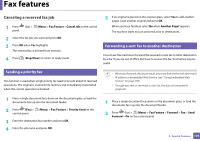
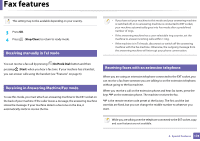
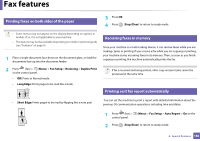
Fax features Canceling a reserved fax job 1 Press (fax) > (Menu) > Fax Feature > Cancel Job on the control panel. 2 Select the fax job you want and press OK. 3 Press OK when Yes highlights. The selected fax is deleted from memory. 4 Press (Stop/Clear) to return to ready mode. 30 Sending a priority fax This function is used when a high priority fax need to be sent ahead of reserved operations. The original is scanned into memory and immediately transmitted when the current operation is finished. 5 If an original is placed on the scanner glass, select Yes to add another pages. Load another original and press OK. When you have finished, select No when Another Page? appears. The machine starts to scan and send a fax to destinations. 31 Forwarding a sent fax to another destination You can set the machine to forward the received or sent fax to other destination by a fax. If you are out of office but have to receive the fax, this feature may be useful. • When you forward a fax by an email, you must first set the mail server and IP address in Embedded Web Service (see "Using Embedded Web Service" on page 184). • Though you sent or received a color fax, the data is forwarded in grayscale. 1 Place a single document face down on the document glass, or load the documents face up into the document feeder. 2 Press (Fax) > (Menu) > Fax Feature > Priority Send on the control panel. 3 Enter the destination fax number and press OK. 4 Enter the job name and press OK. 1 Place a single document face down on the document glass, or load the documents face up into the document feeder. 2 Press (fax) > (Menu) > Fax Feature > Forward > Fax > Send Forward > On on the control panel. 4. Special Features 175
-
 1
1 -
2
-
3
-
4
-
5
-
6
-
7
-
8
-
9
-
10
-
11
-
12
-
13
-
14
-
15
-
16
-
17
-
18
-
19
-
20
-
21
-
22
-
23
-
24
-
25
-
26
-
27
-
28
-
29
-
30
-
31
-
32
-
33
-
34
-
35
-
36
-
37
-
38
-
39
-
40
-
41
-
42
-
43
-
44
-
45
-
46
-
47
-
48
-
49
-
50
-
51
-
52
-
53
-
54
-
55
-
56
-
57
-
58
-
59
-
60
-
61
-
62
-
63
-
64
-
65
-
66
-
67
-
68
-
69
-
70
-
71
-
72
-
73
-
74
-
75
-
76
-
77
-
78
-
79
-
80
-
81
-
82
-
83
-
84
-
85
-
86
-
87
-
88
-
89
-
90
-
91
-
92
-
93
-
94
-
95
-
96
-
97
-
98
-
99
-
100
-
101
-
102
-
103
-
104
-
105
-
106
-
107
-
108
-
109
-
110
-
111
-
112
-
113
-
114
-
115
-
116
-
117
-
118
-
119
-
120
-
121
-
122
-
123
-
124
-
125
-
126
-
127
-
128
-
129
-
130
-
131
-
132
-
133
-
134
-
135
-
136
-
137
-
138
-
139
-
140
-
141
-
142
-
143
-
144
-
145
-
146
-
147
-
148
-
149
-
150
-
151
-
152
-
153
-
154
-
155
-
156
-
157
-
158
-
159
-
160
-
161
-
162
-
163
-
164
-
165
-
166
-
167
-
 168
168 -
 169
169 -
 170
170 -
 171
171 -
 172
172 -
 173
173 -
 174
174 -
 175
175 -
 176
176 -
 177
177 -
 178
178 -
179
-
180
-
181
-
182
-
183
-
184
-
185
-
186
-
187
-
188
-
189
-
190
-
191
-
192
-
193
-
194
-
195
-
196
-
197
-
198
-
199
-
200
-
201
-
202
-
203
-
204
-
205
-
206
-
207
-
208
-
209
-
210
-
211
-
212
-
213
-
214
-
215
-
216
-
217
-
218
-
219
-
220
-
221
-
222
-
223
-
224
-
225
-
226
-
227
-
228
-
229
-
230
-
231
-
232
-
233
 |
 |
