Dell Chromebook 11 3180 Disassembly and Reassembly Guide - For use by Certifie - Page 27
Installing display back cover, Installing camera, Palm rest, Replacing palm rest
 |
View all Dell Chromebook 11 3180 manuals
Add to My Manuals
Save this manual to your list of manuals |
Page 27 highlights
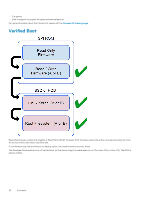
a. Display cable b. LED Daughter board c. Camera module d. Wireless Antennas (Main+Aux) e. Right Display Hinge f. Left Display Hinge Installing display back cover 1. Align the display back cover with the tabs on the computer, and press it until it clicks into place. 2. Follow the procedure in After working inside your computer. Installing camera 1. Place the camera on the display . 2. Connect the camera cable to the connector on the display assembly. 3. Install the: a. display panel b. display bezel c. battery d. base cover 4. Follow the procedure in After working inside your computer Palm rest Replacing palm rest 1. Follow the procedure in Before working inside your computer. 2. Remove the: a. microSD card b. base cover c. battery d. keyboard e. audio f. power connector g. speaker h. display assembly i. system board NOTE: Touchpad is not a standalone component and is assembled along with the palm rest. NOTE: The component you are left with is the palm rest. Disassembly and reassembly 27
-
 1
1 -
2
-
3
-
4
-
5
-
6
-
7
-
8
-
9
-
10
-
11
-
12
-
13
-
14
-
15
-
16
-
17
-
18
-
19
-
20
-
21
-
 22
22 -
 23
23 -
 24
24 -
 25
25 -
 26
26 -
 27
27 -
 28
28 -
 29
29 -
 30
30 -
 31
31 -
 32
32 -
33
-
34
-
35
-
36
-
37
-
38
-
39
-
40
-
41
-
42
-
43
-
44
-
45
-
46
-
47
-
48
-
49
-
50
-
51
-
52
-
53
-
54
-
55
-
56
-
57
-
58
-
59
-
60
-
61
-
62
-
63
-
64
-
65
-
66
-
67
-
68
-
69
 |
 |
