Dell Chromebook 3110 Service Manual - Page 31
For systems shipped with WLAN capabilities, route both WLAN antenna cables underneath the tab on
 |
View all Dell Chromebook 3110 manuals
Add to My Manuals
Save this manual to your list of manuals |
Page 31 highlights
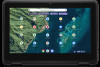
Steps 1. Place the palm-rest assembly on a flat surface. 2. Align the display assembly with the screw holders on the palm-rest assembly. 3. Replace the six screws (M2.5x5) to secure the display assembly to the palm-rest assembly. 4. Adhere the display cable on the system board. 5. Connect the display cable to the connector on system board. 6. Adhere the conductive tape to secure the display cable to the display hinges. NOTE: For Chromebook 3110 systems shipped with WWAN, route the display cable along the routing channels at the bottom-left side of the display back-cover and then adhere the piece of conductive tape to secure the display cable in place. 7. Align and place the display-cable bracket on the display-cable connector on the system board. 8. Replace the screw (M2x4) to secure the display-cable bracket to the display-cable connector on the system board. 9. For systems enabled with 4G LTE, route and adhere the WWAN antenna cables through the routing guides on the palm-rest assembly. 10. Route the WLAN antenna cables through the routing guides on the palm-rest assembly. 11. Connect the WLAN antenna cables to the connectors on the WLAN card module. NOTE: For systems shipped with WLAN capabilities, route both WLAN antenna cables underneath the tab on the right display hinge, then into the rubber cable holder. For systems shipped with WWAN capabilities, route all cables underneath the tab on the right display hinge, then route both WWAN antenna cables and the white main WLAN antenna cable into the rubber cable holder while keeping the black auxiliary WLAN antenna cable outside the cable holder. 12. Replace the WLAN card bracket on the WLAN card module to secure the two antenna cables. 13. Replace the single screw (M2x3) to secure the WLAN card bracket to the WLAN card module on the system board. Next steps 1. Install the WWAN card for systems enabled with 4G LTE. 2. Install the base cover. Removing and installing components 31
-
 1
1 -
2
-
3
-
4
-
5
-
6
-
7
-
8
-
9
-
10
-
11
-
12
-
13
-
14
-
15
-
16
-
17
-
18
-
19
-
20
-
21
-
22
-
23
-
24
-
25
-
 26
26 -
 27
27 -
 28
28 -
 29
29 -
 30
30 -
 31
31 -
 32
32 -
 33
33 -
 34
34 -
 35
35 -
 36
36 -
37
-
38
-
39
-
40
-
41
-
42
-
43
-
44
-
45
-
46
-
47
-
48
-
49
-
50
-
51
-
52
-
53
-
54
-
55
-
56
-
57
-
58
-
59
-
60
-
61
-
62
-
63
-
64
-
65
-
66
-
67
 |
 |
