Dell DX6004S Dell DX Object Storage Platform User’s Guide - Page 36
Device, Format partition, Mount Point
 |
View all Dell DX6004S manuals
Add to My Manuals
Save this manual to your list of manuals |
Page 36 highlights
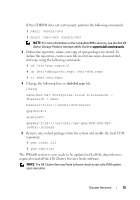
5 Create a 10 GB restore partition of the file system type physical volume (LVM) within the sda and click OK. 6 Select /dev/sdb1 from the Device list and click Edit. 7 Select Format partition as ext3. 8 In the Mount Point field, enter /u01 and click OK. The /u01 mount point occupies the entire space of the sdb. 9 Click Next. The /u01 mount path can also be configured after installing the operating system. To configure the mount path after installing the operating system: 1 Identify the disk to be formatted. To identify the disk to be formatted, run the following command: fdisk -l | grep '^Disk' 2 Create a partition on the /dev/sdb block device using parted: parted /dev/sdb 3 Create a gpt label on the block device: (parted) mklabel Yes/No: Yes New disk label type? [gpt]? gpt 4 Create a partition that consumes the entire available space on /dev/sdb: (parted) mkpart primary ext3 0 -1 Once the partition is created, exit using the following command: (parted) quit 5 Create a file system on the formatted partition table. For example, run the following command: mkfs.ext3 -m1 /dev/sdb1 6 Create the /u01 directory in root directory and mount the file system to the /u01 directory. For example, run the following command: mkdir /u01 mount /dev/sdb1 /u01 36 Disaster Recovery
-
 1
1 -
2
-
3
-
4
-
5
-
6
-
7
-
8
-
9
-
10
-
11
-
12
-
13
-
14
-
15
-
16
-
17
-
18
-
19
-
20
-
21
-
22
-
23
-
24
-
25
-
26
-
27
-
28
-
29
-
30
-
 31
31 -
 32
32 -
 33
33 -
 34
34 -
 35
35 -
 36
36 -
 37
37 -
 38
38 -
 39
39 -
 40
40 -
 41
41 -
42
-
43
-
44
-
45
-
46
 |
 |