Dell EqualLogic PS6210XV PS6210 Installation and Setup Guide - Page 15
Attach the Array to the Mounting Rails, Installing the Bezel, Installing the Bezel 2U Array
 |
View all Dell EqualLogic PS6210XV manuals
Add to My Manuals
Save this manual to your list of manuals |
Page 15 highlights
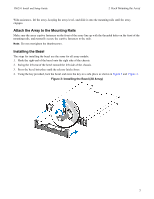
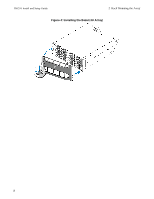
PS6210 Install and Setup Guide 2 Rack Mounting the Array With assistance, lift the array, keeping the array level, and slide it onto the mounting rails until the array engages. Attach the Array to the Mounting Rails Make sure the array captive fasteners on the front of the array line up with the threaded holes on the front of the mounting rails, and manually secure the captive fasteners to the rails. Note: Do not overtighten the thumbscrews. Installing the Bezel The steps for installing the bezel are the same for all array models: 1. Hook the right end of the bezel onto the right side of the chassis. 2. Swing the left end of the bezel toward the left side of the chassis. 3. Press the bezel into place until the release latch closes. 4. Using the key provided, lock the bezel and store the key in a safe place as shown in Figure 3 and Figure 4. Figure 3: Installing the Bezel (2U Array) 7
-
 1
1 -
2
-
3
-
4
-
5
-
6
-
7
-
8
-
9
-
 10
10 -
 11
11 -
 12
12 -
 13
13 -
 14
14 -
 15
15 -
 16
16 -
 17
17 -
 18
18 -
 19
19 -
 20
20 -
21
-
22
-
23
-
24
-
25
-
26
-
27
-
28
-
29
-
30
-
31
-
32
-
33
-
34
-
35
-
36
-
37
-
38
-
39
-
40
-
41
-
42
-
43
-
44
-
45
-
46
 |
 |
