Dell EqualLogic PS6210XV PS6210 Installation and Setup Guide - Page 28
Set the Member RAID Policy, Using the Remote Setup Wizard to Con the Software
 |
View all Dell EqualLogic PS6210XV manuals
Add to My Manuals
Save this manual to your list of manuals |
Page 28 highlights
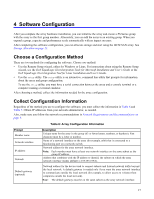
PS6210 Install and Setup Guide 4 Software Configuration Saving the configuration ... Waiting for configuration to become active......Done Group member member1 now active in the group. Group group1 has been created with one member. Use the Group Manager GUI or CLI to set the RAID policy for the member. You can then create a volume that a host can connect to using an iSCSI initiator. group1> Using the Remote Setup Wizard to Configure the Software The Remote Setup wizard is located on the Host Integration Tools CD-ROM and must be installed on a Windows or a Linux computer. The Host Integration Tools User Guide provides detailed information about using the full capabilities of the Remote Setup wizard. To run the Remote Setup wizard, follow these steps: 1. Use a computer that meets the requirements in Choose a Configuration Method on page 17. 2. Obtain the Host Integration Tools CD-ROM from the shipping box, or download the Host Integration Tools kit from the support website. 3. Install the Remote Setup wizard following the instructions in the Host Integration Tools documentation. 4. Start the Remote Setup wizard by clicking: Start, Programs, EqualLogic, Remote Setup Wizard 5. In the Welcome dialog box, select Initialize a PS Series array and click Next. Note: If you cannot contact the array, check the network configuration. You might need to use the setup utility to configure the software. 6. Select the array that you want to initialize and click Next. 7. In the Initialize Array dialog box, enter the array configuration from Table 6 and choose to create a group or join an existing group. Then, click Next. 8. In the Create a New Group or Join an Existing Group dialog box, enter the group configuration from Table 7 and click Next. 9. Click Finish to exit the wizard. If you added the array to an existing group, you must set the member's RAID policy in order to use the disk storage. Go to Set the Member RAID Policy on page 20. If you created a new group, go to Chapter 5, Storage Allocation. Set the Member RAID Policy The storage space in a new group member (array) is not available until you configure a RAID policy on the member. A RAID policy consists of a RAID level and a spare disk configuration. When you select a RAID policy, the member's disks are automatically configured with the selected RAID level and the appropriate number of spare disks. If you used the Remote Setup wizard to create a group, the RAID policy for the first member is set according to your RAID policy selection when configuring the software, and the storage is ready to use. See Storage Allocation on page 23. 20
-
 1
1 -
2
-
3
-
4
-
5
-
6
-
7
-
8
-
9
-
10
-
11
-
12
-
13
-
14
-
15
-
16
-
17
-
18
-
19
-
20
-
21
-
22
-
 23
23 -
 24
24 -
 25
25 -
 26
26 -
 27
27 -
 28
28 -
 29
29 -
 30
30 -
 31
31 -
 32
32 -
 33
33 -
34
-
35
-
36
-
37
-
38
-
39
-
40
-
41
-
42
-
43
-
44
-
45
-
46
 |
 |
