Dell Equallogic PS6010 Storage Arrays - Hardware Owners Manual - Page 21
Disk Drive Handling Requirements, Disk Drive Installation Guidelines and Restrictions
 |
View all Dell Equallogic PS6010 manuals
Add to My Manuals
Save this manual to your list of manuals |
Page 21 highlights
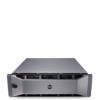
PS6010 Hardware Maintenance Maintaining Disks Disk Drive Handling Requirements Handle disk drives as follows: • Store drives properly. Store replacement disk drives in the packaging in which they were shipped. Do not stack disk drives or place anything on top of a disk drive. • Protect disk drives from electrostatic discharge. Wear an electrostatic wrist strap when handling a disk drive, unless it is protected from electrostatic discharge. See Using an Electrostatic Wrist Strap on page 1-5. • Handle disk drives carefully. Hold a disk drive only by the plastic part of the carrier or the handle. Do not drop or jolt a disk drive or force a disk drive into a slot. • Warm replacement disk drives to room temperature before installation. For example, let a disk drive sit overnight before installing it in an array. • Do not leave disk drive slots empty. Each disk drive slot in an array must contain a disk drive assembly or a blank carrier. Operating an array with an empty slot will void your warranty and support contract. • Do not remove a functioning disk drive (other than a spare) from an array. If the disk drive is not a spare, the RAIDset may become degraded. If you remove a spare, replace the disk drive as soon as possible. • Do not remove a disk drive from its carrier. This action will void your warranty and support contract. • Keep the shipping material. Return a failed disk drive to your array support provider in the packaging in which the replacement disk drive was shipped. Shipping disk drives in unauthorized packaging may void your warranty. Disk Drive Installation Guidelines and Restrictions • Replace a failed disk drive as soon as possible to provide the highest availability. • Install only disk drives of the same type, speed, and spin rate in an array. The color of the handle release button indicates the disk drive type (black for SAS; gray for SATA). • Make sure the disk drive is oriented in the position shown in Figure 2-1, with the handle release button to the left. 2-3
-
 1
1 -
2
-
3
-
4
-
5
-
6
-
7
-
8
-
9
-
10
-
11
-
12
-
13
-
14
-
15
-
 16
16 -
 17
17 -
 18
18 -
 19
19 -
 20
20 -
 21
21 -
 22
22 -
 23
23 -
 24
24 -
 25
25 -
 26
26 -
27
-
28
-
29
-
30
-
31
-
32
-
33
-
34
-
35
-
36
-
37
-
38
-
39
-
40
-
41
-
42
-
43
-
44
-
45
-
46
-
47
-
48
-
49
-
50
-
51
-
52
-
53
-
54
-
55
-
56
-
57
 |
 |