Dell I15RN-3647BK Service Manual - Page 28
The heat sink can get very hot during normal operation. Be sure that the heat sink has had
 |
View all Dell I15RN-3647BK manuals
Add to My Manuals
Save this manual to your list of manuals |
Page 28 highlights
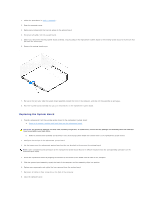
CAUTION: The heat sink can get very hot during normal operation. Be sure that the heat sink has had sufficient time to cool before you touch it. 5. Remove the heat sink: a. On the retention base locate the tab opposite the power supply. Press on the retention base tab until the heat sink pops up slightly. b. Press out on the second retention tab while lifting the heat sink up and out of the retention base. NOTICE: Lay the heat sink down on its side. NOTICE: If you are installing a processor upgrade kit from Dell, discard the original heat sink. If you are not installing a processor upgrade kit from Dell, reuse the original heat sink and blower when you install your new processor. 6. Push down and out on the socket release lever. 7. Open the processor cover.
-
 1
1 -
2
-
3
-
4
-
5
-
6
-
7
-
8
-
9
-
10
-
11
-
12
-
13
-
14
-
15
-
16
-
17
-
18
-
19
-
20
-
21
-
22
-
 23
23 -
 24
24 -
 25
25 -
 26
26 -
 27
27 -
 28
28 -
 29
29 -
 30
30 -
 31
31 -
 32
32 -
 33
33 -
34
-
35
-
36
-
37
-
38
-
39
-
40
-
41
-
42
-
43
-
44
-
45
-
46
-
47
-
48
-
49
-
50
 |
 |
