Dell I15RN-3647BK Service Manual - Page 29
Installing the Processor
 |
View all Dell I15RN-3647BK manuals
Add to My Manuals
Save this manual to your list of manuals |
Page 29 highlights
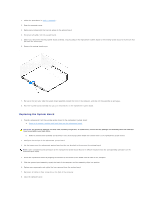
8. To remove the processor from the socket, lift the processor vertically in one motion. Leave the release lever extended in the release position so that the socket is ready for the new processor. Installing the Processor NOTICE: Ground yourself by touching an unpainted metal surface on the back of the computer. 1. Unpack the new processor. NOTICE: You must position the processor correctly in the socket to avoid permanent damage to the processor and the computer when you turn on the computer. 2. If the release lever on the socket is not fully extended, move it to that position. 3. Align the pin-1 corners of the processor and socket.
-
 1
1 -
2
-
3
-
4
-
5
-
6
-
7
-
8
-
9
-
10
-
11
-
12
-
13
-
14
-
15
-
16
-
17
-
18
-
19
-
20
-
21
-
22
-
23
-
 24
24 -
 25
25 -
 26
26 -
 27
27 -
 28
28 -
 29
29 -
 30
30 -
 31
31 -
 32
32 -
 33
33 -
 34
34 -
35
-
36
-
37
-
38
-
39
-
40
-
41
-
42
-
43
-
44
-
45
-
46
-
47
-
48
-
49
-
50
 |
 |

8.
To remove the processor from the socket, lift the processor vertically in one motion.
Leave the release lever extended in the release position so that the socket is ready for the new processor.
Installing the Processor
1.
Unpack the new processor.
2.
If the release lever on the socket is not fully extended, move it to that position.
3.
Align the pin-1 corners of the processor and socket.
NOTICE:
Ground yourself by touching an unpainted metal surface on the back of the computer.
NOTICE:
You must position the processor correctly in the socket to avoid permanent damage to the processor and the computer when you turn on the
computer.