Dell M2400 Service Manual - Page 39
hard drive bracket 4 corner of hard drive bracket 2
 |
View all Dell M2400 manuals
Add to My Manuals
Save this manual to your list of manuals |
Page 39 highlights
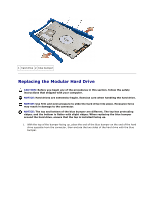
1 hard drive 2 blue bumper 3 connector 4 top of blue bumper 2. Place the end that is opposite from the connector on the hard drive into the hard drive bracket, ensuring that the hard drive fits into each corner of the hard drive bracket. 3. Lower the hard drive into the hard drive bracket. 1 hard drive 2 connector 3 hard drive bracket 4 corner of hard drive bracket (2) 4. Place the hard drive in the carrier at an angle, aligning the hard drive connector with the connector in the carrier. 5. Slide the hard drive fully into the connector in the carrier.
-
 1
1 -
2
-
3
-
4
-
5
-
6
-
7
-
8
-
9
-
10
-
11
-
12
-
13
-
14
-
15
-
16
-
17
-
18
-
19
-
20
-
21
-
22
-
23
-
24
-
25
-
26
-
27
-
28
-
29
-
30
-
31
-
32
-
33
-
 34
34 -
 35
35 -
 36
36 -
 37
37 -
 38
38 -
 39
39 -
 40
40 -
 41
41 -
 42
42 -
 43
43 -
 44
44 -
45
-
46
-
47
-
48
-
49
-
50
-
51
-
52
-
53
-
54
-
55
-
56
-
57
-
58
-
59
-
60
-
61
-
62
-
63
-
64
-
65
 |
 |

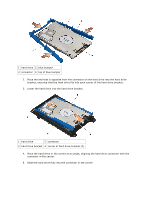
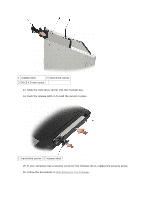
1 hard drive 2 blue bumper
3 connector 4 top of blue bumper
2.
Place the end that is opposite from the connector on the hard drive into the hard drive
bracket, ensuring that the hard drive fits into each corner of the hard drive bracket.
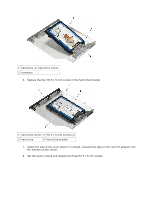
3.
Lower the hard drive into the hard drive bracket.
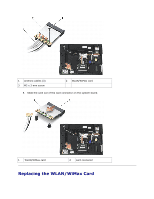
1 hard drive
2 connector
3 hard drive bracket 4 corner of hard drive bracket (2)
4.
Place the hard drive in the carrier at an angle, aligning the hard drive connector with the
connector in the carrier.
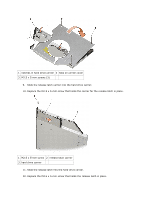
5.
Slide the hard drive fully into the connector in the carrier.