Dell P2014H DELL Users Guide
Dell P2014H Manual
 |
View all Dell P2014H manuals
Add to My Manuals
Save this manual to your list of manuals |
Dell P2014H manual content summary:
- Dell P2014H | DELL Users Guide - Page 1
User's Guide DELL P2014H Model No.: P2014H Regulatory model: P2014Ht - Dell P2014H | DELL Users Guide - Page 2
Bottom View...11 Monitor Specifications 12 Flat-Panel Specifications 12 Resolution Specifications 13 Video Supported Modes 13 Preset Display Modes 13 Electrical Specifications 13 Physical Characteristics 14 Environmental Characteristics 14 Power Management Modes 15 Pin - Dell P2014H | DELL Users Guide - Page 3
Common Problems 50 Product Specific Problems 55 Universal Serial Bus(USB) Specific Problems 56 Appendix 57 WARNING: Safety Instructions 57 FCC Notices (U.S. Only) and Other Regulatory Information 57 Contacting Dell 57 Setting Up Your Monitor 58 Setting the display resolution to - Dell P2014H | DELL Users Guide - Page 4
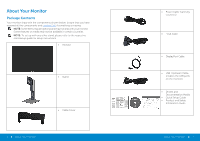
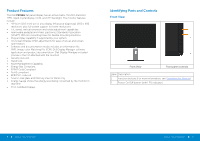
refer to the respective stand setup guide for setup instructions. • Monitor • Stand • Cable Cover 6 About Your Monitor • Power Cable (varies by countries) • VGA Cable • DisplayPort Cable • USB Upstream Cable (enables the USB ports on the monitor) • Drivers and Documentation Media • Quick Setup - Dell P2014H | DELL Users Guide - Page 5
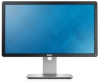
Features The Dell P2014H flat panel display has an active matrix, thin-film transistor (TFT), liquid crystal display (LCD), and LED backlight. The monitor features include: • 49.41 cm (19.5 inch) active area display (Measured diagonally) 1600 x 900 resolution, plus full-screen support for lower - Dell P2014H | DELL Users Guide - Page 6
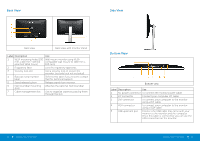
contact Dell for technical support. Release stand from monitor. Attaches the optional Dell Soundbar. Use to organize cables by placing them through the slot. 10 About Your Monitor Bottom View Bottom view Label Description Use 1. AC power connector To connect the monitor power cable. 2. DP - Dell P2014H | DELL Users Guide - Page 7
USB upstream connector on the monitor. 7 Stand lock To disable the stand release button and lock the stand assembly using an M3 X 6 mm screw (screw not included). Monitor Specifications Flat Panel Specifications Screen type Panel type Viewable image dimensions Diagonal Horizontal Active Area - Dell P2014H | DELL Users Guide - Page 8
maximum) 68.24 BTU/hour (typical) Power Management Modes If you have VESA's DPM™ compliance display card or software installed in your PC, the monitor can automatically reduce its power consumption when not in use. This is referred to as Power Save Mode. If the computer detects input from keyboard - Dell P2014H | DELL Users Guide - Page 9
NOTE: This monitor is ENERGY STAR®-compliant. NOTE: Zero power consumption in OFF mode can only be achieved by disconnecting the main cable from the monitor. Pin Assignments clock 16 About Your Monitor DVI Connector Pin Number 1 2 3 4 5 6 7 8 9 10 11 12 13 14 15 16 17 18 19 20 21 22 23 24 24- - Dell P2014H | DELL Users Guide - Page 10
Displayport Connector Pin Number 1 2 3 4 5 6 7 8 9 10 11 12 13 14 15 16 17 18 19 20 20-pin Side of the ConnectedSignal Cable ML0(p) GND ML0(n) ML1(p) GND ML1(n) ML2(p) GND ML2(n) ML3(p) GND ML3(n) GND GND AUX(p) GND AUX(n) HPD Re-PWR PWR Plug and Play Capability You can install the monitor in any - Dell P2014H | DELL Users Guide - Page 11
on Dell Monitor Quality and Pixel Policy, see Dell Support site at http://www.dell.com/support/monitors. Maintenance Guidelines Cleaning Your Monitor WARNING: Read and follow the safety instructions before cleaning the monitor. WARNING: Before cleaning the monitor, unplug the monitor power cable - Dell P2014H | DELL Users Guide - Page 12
section, follow the Safety Instructions. To connect your monitor to the computer: 1. Turn off your computer and disconnect the power cable. 2. Connect either the white (digital DVI-D) or the blue (analog VGA) display connector cable or the black( DisplayPort) to the corresponding video port - Dell P2014H | DELL Users Guide - Page 13
scratches on the LCD screen while removing the stand, ensure that the monitor is placed on a clean surface. NOTE: This is applicable for a monitor with a stand. When any other stand is bought, please refer to the respective stand setup guide for set up instructions. After attaching all necessary - Dell P2014H | DELL Users Guide - Page 14
(Optional) Operating the Monitor Power On the Monitor Press the button to turn on the monitor (Screw dimension: M4 x 10 mm). Refer to the instructions that come with the VESA-compatible wall mounting kit. 1. Place the monitor panel on a soft cloth or cushion on stable flat table. 2. Remove the - Dell P2014H | DELL Users Guide - Page 15
OSD main menu. Exit Use the Power button to turn the monitor on and off. 5 The Blue LED indicates the monitor is on and fully Power functional. An amber LED indicates DPMS power (with power light save mode. indicator) 28 Operating the Monitor Front Panel Button Use the buttons on the - Dell P2014H | DELL Users Guide - Page 16
Screen Display (OSD) Menu Accessing the Menu System NOTE: If you change the settings and then either proceed to another menu or exit the OSD menu, the monitor automatically saves those changes. The changes are also saved parameter. 5. Press to enter the slide bar and then use the or button, according - Dell P2014H | DELL Users Guide - Page 17
Displays Settings. The following dialog appears on a black screen as the monitor automatically adjusts to the current input: NOTE: In DisplayPort input when you are using the DisplayPort(DP) connector. Press DisplayPort input source. to select the 32 Operating the Monitor Operating the Monitor - Dell P2014H | DELL Users Guide - Page 18
DVD player using the VGA and DVI cable or the HDMI to DVI adapter. • YPbPr: Select this option if your DVD player supports only YPbPr output. • Standard: Loads the monitor's default color settings. This is the default preset mode. • Multimedia: Loads color settings ideal for multimedia applications - Dell P2014H | DELL Users Guide - Page 19
: Saturation adjustment is available only for video input. Resets your monitor's color settings to the factory defaults. 36 Operating the Monitor DISPLAY SETTINGS Use the Display Settings to adjust image. Wide Mode Horizontal Position Vertical Position Sharpness Pixel Clock Adjust the image - Dell P2014H | DELL Users Guide - Page 20
"on" will activate the dynamic dimming. With Energy Smart turned on, the monitor will consume overall less power compared to when Energy Smart is turned "off". NOTE: Under Energy Smart mode, the energy usage bar will decrease when transitioning from bright scenes to darker scenes. The energy usage - Dell P2014H | DELL Users Guide - Page 21
of time the menu remains on screen, and so on. DDC/CI DDC/CI (Display Data Channel/Command Interface) allows your monitor parameters (brightness, color balance etc) Preset Modes, Brightness/ Contrast, Auto Adjust, Input Source, Aspect Ratio and set as shortcut key. 40 Operating the Monitor - Dell P2014H | DELL Users Guide - Page 22
from the computer. See Monitor Specifications for the Horizontal and Vertical frequency ranges addressable by this monitor. Recommended mode is 1600 x 900. You will see the following message before the DDC/CI function is disabled. When monitor enters Power Save mode, the following message appears - Dell P2014H | DELL Users Guide - Page 23
the following procedures: If you have a Dell desktop or portable computer: • Go to www.dell.com/support, enter your service tag, and download the latest driver for your graphics card. If you are using a non-Dell computer (portable or desktop): • Go to the support site for your computer and download - Dell P2014H | DELL Users Guide - Page 24
computer, you require an updated graphics driver that is not included with this monitor. To download the graphics driver, go to www.dell.com/support and see the download section for Video Drivers for latest driver updates. When in the Portrait View Mode, you may experience performance degradation in - Dell P2014H | DELL Users Guide - Page 25
the back of computer. 3. Turn on the monitor. The floating dialog box should appear on-screen (against a black background) if the monitor cannot sense a video signal and is working correctly. While in self-test mode, the power LED remains blue. Also, depending upon the selected input - Dell P2014H | DELL Users Guide - Page 26
screen has spots • Relocate the monitor and test in another room. • Cycle power on-off. • Pixel that is permanently off is a natural defect that can occur in LCD technology. • For more information on Dell Monitor Quality and Pixel Policy, see Dell Support site at: www.dell. com/support/monitors - Dell P2014H | DELL Users Guide - Page 27
Brightness Problems Picture too dim or too bright Geometric Distortion Screen not centered correctly • Cycle power on-off. • Pixel that is permanently off is a natural defect that can occur in LCD technology. • For more information on Dell Monitor Quality and Pixel Policy, see Dell Support site - Dell P2014H | DELL Users Guide - Page 28
with screen the buttons on the front panel Turn off the monitor, unplug the power cord, plug back, and then turn on the monitor. No Input No picture, Signal when the LED light user controls is white. are pressed • Check the signal source. Ensure the Computer is not in the power saving mode - Dell P2014H | DELL Users Guide - Page 29
DVDs, the monitor may display the entire the height or in full screen. screen. width of the screen • Run the built-in diagnostics. NOTE: When choosing DVI-D mode, the Auto Adjust function will not be available. Universal Serial Bus (USB) Specific Problems Specific Symptoms USB interface - Dell P2014H | DELL Users Guide - Page 30
. If you have a Dell desktop or a Dell portable computer with internet access 1. Go to www.dell.com/support, enter your service tag, and download the latest driver for your graphics card. 2. After installing the drivers for your Graphics Adapter, attempt to set the resolution to 1600 x 900 again - Dell P2014H | DELL Users Guide - Page 31
driver (for example, http://www.ATI.com OR http://www.NVIDIA.com ). 7. After installing the drivers for your Graphics Adapter, attempt to set the resolution a graphics adapter that will support the video resolution of 1600 x 900. Procedures for setting up dual monitors in Windows Vista®, Windows® - Dell P2014H | DELL Users Guide - Page 32
to toggle be tween the display selections. Method 2: Using the "Screen Resolution" menu 1. Right-click on the desktop and click Screen resolution. 2. Click Multiple displays to choose a display selection. If you do not see the additional monitor listed, click Detect. You may need to restart your - Dell P2014H | DELL Users Guide - Page 33
Method 2: Using the "Screen Resolution" menu 1. From the Start screen, select Desktop tile to switch to the Classic Windows desktop. (c) For Windows® 8 Connect the external monitor(s) to your laptop or desktop using a video cable (VGA, DVI, DP etc.) and follow any of the below setup method. - Dell P2014H | DELL Users Guide - Page 34
Multiple displays menu: Duplicate, Extend, Show Desktop On. Duplicate these displays: Duplicate the same screen on two monitors with the same resolution, chosen based on the monitor with a lower resolution. (i) For Windows Vista® [DUPLICATE NOT AVAILABLE] (ii) For Windows® 7 66 Setting Up Your - Dell P2014H | DELL Users Guide - Page 35
these displays: This option is recommended when an exter nal monitor is connected to a laptop, and each monitor can display different screen independently to improve user convenience. The rel ative position of the screens can be set up here, for example monitor 1 may be set up to be to the left of - Dell P2014H | DELL Users Guide - Page 36
PC so the user can enjoy a large external monitor. Most current laptops support mainstream resolutions. As shown in the figure above, the resolution of the laptop monitor is only 1366 x 768, but after connecting a 23" external LCD monitor, users can immediately improve their visual enjoyment to 1600 - Dell P2014H | DELL Users Guide - Page 37
•: I [ OK ~ [ CanceCJ Apply 72 Setting Up Your Monitor (iii) For Windows® 8 Screen Resolution ' t IJi J - Dell P2014H | DELL Users Guide - Page 38
74 Setting Up Your Monitor
-
 1
1 -
 2
2 -
 3
3 -
 4
4 -
 5
5 -
 6
6 -
 7
7 -
8
-
9
-
10
-
11
-
12
-
13
-
14
-
15
-
16
-
17
-
18
-
19
-
20
-
21
-
22
-
23
-
24
-
25
-
26
-
27
-
28
-
29
-
30
-
31
-
32
-
33
-
34
-
35
-
36
-
37
-
38
 |
 |

User’s Guide±
DELL P2014H
Model No.: P2014H
Regulatory model: P2014Ht