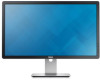
Dell P2414H Dell User Guide
Dell P2414H Manual
 |
View all Dell P2414H manuals
Add to My Manuals
Save this manual to your list of manuals |
Dell P2414H manual content summary:
- Dell P2414H | Dell User Guide - Page 1
User's Guide Dell P2214H Dell P2414H Model No.: P2214H / P2414H Regulatory model: P2214Hb / P2214Hb - Dell P2414H | Dell User Guide - Page 2
damage to hardware or loss of data if instructions are not followed. WARNING: A WARNING indicates a potential for property damage, personal injury, or death. Information in this document is subject to change without notice. © 2013 Dell Inc. All rights reserved. Reproduction of these materials - Dell P2414H | Dell User Guide - Page 3
Organizing Your Cables 23 Removing the Monitor Stand 24 Wall Mounting (Optional 25 3 Operating the Monitor 27 Power On the Monitor 27 Using the Front Panel Controls 27 Using the On-Screen Display (OSD) Menu 29 Setting the Maximum Resolution 43 Adjusting the Rotation Display Settings of Your - Dell P2414H | Dell User Guide - Page 4
5 Appendix 53 FCC Notices (U.S. Only) and Other Regulatory Information 53 Contacting Dell 53 Setting Up Your Monitor 53 4 | Contents - Dell P2414H | Dell User Guide - Page 5
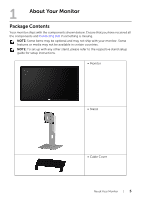
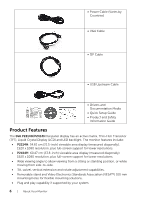
Dell if something is missing. NOTE: Some items may be optional and may not ship with your monitor. Some features or media may not be available in certain countries. NOTE: To set up with any other stand, please refer to the respective stand setup guide for setup instructions. • Monitor • Stand - Dell P2414H | Dell User Guide - Page 6
). 1920 x 1080 resolution, plus full-screen support for lower resolutions. • P2414H: 60.47 cm (23.8-inch) viewable area display (measured diagonally). 1920 x 1080 resolution, plus full-screen support for lower resolutions. • Wide viewing angle to allow viewing from a sitting or standing position, or - Dell P2414H | Dell User Guide - Page 7
Color Matching File (ICM), and product documentation. • Dell Display Manager Software included (comes in the CD shipped with the monitor). • Energy Saver feature for Energy Star compliance. • Security lock slot. • Stand lock. • Capability to switch from wide aspect to standard aspect ratio while - Dell P2414H | Dell User Guide - Page 8
mm x 100 mm). Lists the regulatory approvals. Release stand from monitor. Secures monitor with security lock (security lock not included). Refer to this label if you need to contact Dell for technical support. Attaches the optional Dell Soundbar. Use to organize cables by placing them through the - Dell P2414H | Dell User Guide - Page 9
Side View Bottom View Bottom view without monitor stand Label Description 1 AC power cord connector 2 DP connector 3 DVI connector 4 VGA connector 5 USB upstream port Use Connect the power cable. Connect your computer with DP cable. Connect your computer with DVI cable. Connect your - Dell P2414H | Dell User Guide - Page 10
screw (screw not included). Monitor Specifications Flat Panel Specifications Model Screen type Panel type Screen dimensions Viewable image dimension • Horizontal • Vertical Pixel pitch Viewing angle Luminance output Contrast ratio Faceplate coating Backlight Response time Color depth Color gamut - Dell P2414H | Dell User Guide - Page 11
resolution P2214H 30 kHz to 83 kHz (automatic) 56 Hz to 76 Hz (automatic) 1920 x 1080 at 60 Hz P2414H 30 kHz to 83 kHz (automatic) 56 Hz to 76 Hz (automatic) 1920 x 1080 at 60 Hz Supported Video Modes Model Video display .0 148.5 Sync Polarity (Horizontal/ Vertical) About Your Monitor | 11 - Dell P2414H | Dell User Guide - Page 12
50 ohm input impedance • DP 1.2 signal input support* Separate horizontal and vertical synchronizations, polarity-free Audio (or high data rate audio) Physical Characteristics Model Connector type Signal cable type Dimensions (with stand) Height (extended) Height (compressed) Width P2214H P2414H - Dell P2414H | Dell User Guide - Page 13
Dimensions (without stand) Height Width Depth Stand dimensions Height (extended) Height (compressed) Width Depth Weight Weight with packaging Weight with stand assembly and cables Weight without stand assembly (For wall mount or VESA mount considerations - no cables) Weight of stand P2214H/P2414H 0 - Dell P2414H | Dell User Guide - Page 14
Management Modes If you have VESA's DPM™ compliance display card or software installed in your PC, the monitor can automatically reduce its power consumption when not in Consumption P2214H 42 W (maximum)** 26 W (typical) Less than 0.3 W P2414H 45 W (maximum)** 28 W (typical) Less than 0.3 W Less - Dell P2414H | Dell User Guide - Page 15
consumption in OFF mode can only be achieved by disconnecting the main cable from the monitor. ** Maximum power consumption with max luminance, and USB active. Pin Assignments VGA Connector V/3.3 V 10 GND-sync 11 GND 12 DDC data 13 H-sync 14 V-sync 15 DDC clock About Your Monitor | 15 - Dell P2414H | Dell User Guide - Page 16
DVI Connector Pin 24-pin Side of the Number Connected Signal Cable 1 TMDS RX2- 2 TMDS RX2+ 3 TMDS Ground 4 Floating 5 Floating 6 DDC Detect 17 TMDS RX0- 18 TMDS RX0+ 19 TMDS Ground 20 Floating 21 Floating 22 TMDS Ground 23 TMDS Clock+ 24 TMDS Clock- 16 | About Your - Dell P2414H | Dell User Guide - Page 17
GND Re-PWR PWR Plug and Play Capability You can install the monitor in any Plug and Play-compatible system. The monitor automatically provides the computer system with its Extended Display Identification Data (EDID) using Display Data Channel (DDC) protocols so the system can configure itself and - Dell P2414H | Dell User Guide - Page 18
Universal Serial Bus (USB) Interface This section gives you information about the USB ports that are available on the monitor. NOTE: This monitor supports High-Speed Certified USB 2.0 interface. Transfer Speed High speed Full speed Low speed Data Rate 480 Mbps 12 Mbps 1.5 Mbps Power Consumption - Dell P2414H | Dell User Guide - Page 19
affect the display quality or usability. For more information on Dell Monitor Quality and Pixel Policy, see Dell Support site at: http://www.dell.com/support/monitors. Maintenance Guidelines Cleaning Your Monitor CAUTION: Read and follow the Safety Instructions before cleaning the monitor. WARNING - Dell P2414H | Dell User Guide - Page 20
with a cloth. • Handle your monitor with care as a darker-colored monitor may get scratched and show white scuff marks more than a lighter-colored monitor. • To help maintain the best image quality on your monitor, use a dynamically changing screen saver and turn off your monitor when not in use. 20 - Dell P2414H | Dell User Guide - Page 21
shipped from the factory. NOTE: This is applicable for a monitor with a stand. When any other stand is bought, please refer to the respective stand setup guide for the set up instructions. To attach the monitor stand: 1. Remove the cover and place the monitor on it. 2. Fit the two tabs on the upper - Dell P2414H | Dell User Guide - Page 22
Connecting the blue VGA cable Connecting the white DVI cable Connecting the black DisplayPort cable CAUTION: The graphics are used for the purpose of illustration only. Appearance of the computer may vary. 22 | Setting Up the Monitor - Dell P2414H | Dell User Guide - Page 23
into a nearby outlet. 4. Turn on the monitor and the computer. If your monitor displays an image, installation is complete. If it does not display an image, see Universal Serial Bus (USB) Specific Problems. 5. Use the cable slot on the monitor stand to organize the cables. Organizing Your Cables - Dell P2414H | Dell User Guide - Page 24
a monitor with a stand. When any other stand is bought, please refer to the respective stand setup guide for the set-up instructions. .To remove the stand: 1. Place the monitor on a soft cloth or cushion. 2. Press and hold the stand release button. 3. Lift the stand up and away from the monitor 24 - Dell P2414H | Dell User Guide - Page 25
Wall Mounting (Optional) (Screw dimension: M4 x 10 mm). Refer to the instructions that come with the VESA-compatible wall mounting kit. 1. Place the monitor panel on a soft cloth or cushion on a stable, flat table. 2. Remove the stand. 3. Use a Phillips crosshead screwdriver to remove the four - Dell P2414H | Dell User Guide - Page 26
26 | Setting Up the Monitor - Dell P2414H | Dell User Guide - Page 27
. Using the Front Panel Controls Use the control buttons on the front of the monitor to adjust the characteristics of the image being displayed. As you use these buttons to adjust the controls, an OSD shows the numeric values of the characteristics as they change. The following table describes - Dell P2414H | Dell User Guide - Page 28
key/ Brightness/ Contrast 3 Use the MENU button to launch the On-Screen Display (OSD) and select the OSD Menu. See Accessing the Menu System. save mode. Front Panel Button Use the buttons on the front of the monitor to adjust the image settings. Front Panel Button 1 Up 2 Down Description - Dell P2414H | Dell User Guide - Page 29
Back button to go back to the previous menu. Back Using the On-Screen Display (OSD) Menu Accessing the Menu System NOTE: If you change the settings and then either proceed to another menu or exit the OSD menu, the monitor automatically saves those changes. The changes are also saved if you change - Dell P2414H | Dell User Guide - Page 30
move from one icon to another, the option name is highlighted. See the following table for a complete list of all the options available for the monitor. 3. Press the button once to activate the highlighted option. 4. Press and button to select the desired parameter. 30 | Operating the - Dell P2414H | Dell User Guide - Page 31
5. Press to enter the slide bar and then use the and to the indicators on the menu, to make your changes. 6. Select the button to return to the main menu. buttons, according Operating the Monitor | 31 - Dell P2414H | Dell User Guide - Page 32
button to decrease the brightness (min. 0 / max 100). NOTE: Manual adjustment of Brightness is disabled when Energy Smart or Dynamic Contrast is switched monitor screen. Auto Adjust Even though your computer recognizes your monitor on startup, the Auto Adjustment function optimizes the display - Dell P2414H | Dell User Guide - Page 33
Input Source Use the Input Source menu to select between the different video signals that may be connected to your monitor. Auto Select Press to select Auto Select, the monitor scans for available input sources. VGA Select the VGA input when you are using the analog (VGA) connector. Press to - Dell P2414H | Dell User Guide - Page 34
Format Allows you to set the video input mode to: RGB: Select this option if your monitor is connected to a computer or DVD player using the VGA and DVI cable. YPbPr: Select this option if your monitor is connected to a DVD player by YPbPr to VGA, or YPbPr to DVI cable; or - Dell P2414H | Dell User Guide - Page 35
, Multimedia, Movie, Game, Text, Warm, Cool or Custom Color from the list. • Standard: Loads the monitor's default color settings. screen appears warmer with a red/yellow tint. • Cool: Decreases the color temperature. The screen appears cooler with a blue tint. • Custom Color: Allows you to manually - Dell P2414H | Dell User Guide - Page 36
when you select Standard, Multimedia, Movie, or Game preset mode. Reset Color Reset your monitor color settings to the factory settings. Settings Display Use the Display Settings to adjust image. Settings Aspect Ratio Adjusts the image ratio to Wide 16:9, 4:3, or 5:4. Horizontal Use or to adjust - Dell P2414H | Dell User Guide - Page 37
feature automatically reduces the screen's brightness level when the displayed image contains a high proportion of bright areas. Power Allows you to set the power LED indicator on or off to save energy. Button LED USB Allows you to enable or disable USB function during monitor standby mode. NOTE - Dell P2414H | Dell User Guide - Page 38
of time the menu remains on screen, and so on. Language Language options set the OSD display to Lock Controls user access to adjustments. When Lock is selected, no user adjustments are allowed. All buttons are locked. NOTE: Lock function - Either soft lock (through the OSD menu) or hard lock - Dell P2414H | Dell User Guide - Page 39
DDC/CI DDC/CI (Display Data Channel/Command Interface) allows your monitor parameters (brightness, color balance, and etc.) to be adjustable via the software on your computer. You can disable this feature by selecting Disable. Enable this feature for best user experience and optimum performance - Dell P2414H | Dell User Guide - Page 40
some time Users can choose a feature from Preset Modes, Brightness/Contrast, Auto Adjust, Input Source, Aspect Ratio, or Rotation and set it as a shortcut key. NOTE: This monitor has a built-in feature to automatically calibrate the brightness to compensate for LED aging. 40 | Operating the Monitor - Dell P2414H | Dell User Guide - Page 41
Contrast feature is enabled (in these preset modes: Game or Movie), the manual brightness adjustment is disabled. When the monitor does not support a particular resolution mode, you will see the following message: This means that the monitor cannot synchronize with the signal that it is receiving - Dell P2414H | Dell User Guide - Page 42
the Power Save mode, the following message appears: Activate the computer and wake up the monitor to gain access to the OSD. If you press any button other than the power button, one the corresponding cable is not connected, a floating dialog box as shown below appears. or 42 | Operating the Monitor - Dell P2414H | Dell User Guide - Page 43
Screen Resolution and select 1920 x 1080. 4. Click OK. If you do not see 1920 x 1080 as an option, you may need to update your graphics driver. Depending on your computer, complete one of the following procedures: If you have a Dell desktop or portable computer: • Go to http://www.dell.com/support - Dell P2414H | Dell User Guide - Page 44
Extension NOTE: This is applicable for a monitor with a stand. When any other stand is bought, please refer to the respective stand setup guide for set up instructions. Tilt, Swivel With the stand attached to the monitor, you can tilt and swivel the monitor for the most comfortable viewing angle - Dell P2414H | Dell User Guide - Page 45
the bottom edge of the monitor. To use the Display Rotation function (Landscape versus Portrait view) with your Dell computer, you require an updated graphics driver that is not included with this monitor. To download the graphics driver, go to www.dell.com/support and see the Download section - Dell P2414H | Dell User Guide - Page 46
Graphic Properties, select the Rotation tab, and then set the preferred rotation. NOTE: If you do not see the rotation option or it is not working correctly, go to www.dell.com/support and download the latest driver for your graphics card. 46 | Operating the Monitor - Dell P2414H | Dell User Guide - Page 47
on-screen (against a black background), if the monitor cannot sense a video signal and is working correctly. While in self-test mode, the power LED remains white. Also, depending upon the selected input, one of the dialogs shown below will continuously scroll through the screen. or Troubleshooting - Dell P2414H | Dell User Guide - Page 48
and the monitor is in self-test mode. To run the built-in diagnostics: 1. Ensure that the screen is clean (no dust particles on the surface of the screen). 2. Unplug the video cable(s) from the back of the computer or monitor. The monitor then goes into the self-test mode. 48 | Troubleshooting - Dell P2414H | Dell User Guide - Page 49
Settings. • Change the video resolution to the correct aspect ratio. • Perform Auto Adjust via OSD. • Adjust the Phase and Pixel Clock controls via OSD. • Reset the monitor to Factory Settings. • Check environmental factors. • Relocate the monitor and test in another room. Troubleshooting | 49 - Dell P2414H | Dell User Guide - Page 50
and Pixel Policy, see Dell Support site at:http://www.dell.com/ support/monitors. Brightness Problems Picture too dim or too bright • Reset the monitor to Factory Settings. • Auto Adjust via OSD. • Adjust brightness & contrast controls via OSD. Geometric Distortion Screen not centered correctly - Dell P2414H | Dell User Guide - Page 51
Problems Specific Symptoms What You Experience Screen image is Image is too small centered on screen, but does not fill entire viewing area Cannot adjust the monitor with the buttons on the side panel OSD does not appear on the screen No Input Signal No picture, the when user LED - Dell P2414H | Dell User Guide - Page 52
Universal Serial Bus (USB) Specific Problems Specific Symptoms What You Experience Possible Solutions USB interface is USB peripherals not working are not working • Check that your monitor is turned on. • Reconnect the upstream cable to your computer. • Reconnect the USB peripherals (downstream - Dell P2414H | Dell User Guide - Page 53
left side of the page. 4. Select the appropriate service Sor support link based on your need. 5. Choose the method of contacting Dell that is convenient for you. Setting Up Your Monitor Setting the display resolution For maximum display performance with Microsoft® Windows® operating systems, set the - Dell P2414H | Dell User Guide - Page 54
card If you have a Dell™ desktop or a Dell™ portable computer with internet access 1. Go to www.dell.com/support, enter your service tag, and download the latest driver for your graphics card. 2. After installing the drivers for your graphics adapter, attempt to set the resolution to 1920 x 1080
-
 1
1 -
 2
2 -
 3
3 -
 4
4 -
 5
5 -
 6
6 -
 7
7 -
8
-
9
-
10
-
11
-
12
-
13
-
14
-
15
-
16
-
17
-
18
-
19
-
20
-
21
-
22
-
23
-
24
-
25
-
26
-
27
-
28
-
29
-
30
-
31
-
32
-
33
-
34
-
35
-
36
-
37
-
38
-
39
-
40
-
41
-
42
-
43
-
44
-
45
-
46
-
47
-
48
-
49
-
50
-
51
-
52
-
53
-
54
 |
 |

User’s Guide
Dell P2214H
Dell P2414H
Model No.: P2214H / P2414H
Regulatory model: P2214Hb / P2214Hb