Dell P2414H Dell User Guide - Page 8
Back View, Back View with monitor stand, Label, Description - soundbar
 |
View all Dell P2414H manuals
Add to My Manuals
Save this manual to your list of manuals |
Page 8 highlights
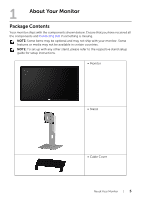
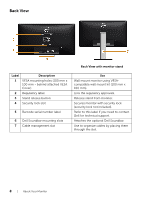
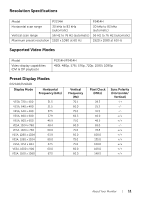
Back View Back View with monitor stand Label Description 1 VESA mounting holes (100 mm x 100 mm - behind attached VESA Cover) 2 Regulatory label 3 Stand release button 4 Security lock slot 5 Barcode serial number label 6 Dell Soundbar mounting slots 7 Cable management slot Use Wall mount monitor using VESAcompatible wall mount kit (100 mm x 100 mm). Lists the regulatory approvals. Release stand from monitor. Secures monitor with security lock (security lock not included). Refer to this label if you need to contact Dell for technical support. Attaches the optional Dell Soundbar. Use to organize cables by placing them through the slot. 8 | About Your Monitor
-
 1
1 -
2
-
 3
3 -
 4
4 -
 5
5 -
 6
6 -
 7
7 -
 8
8 -
 9
9 -
 10
10 -
 11
11 -
 12
12 -
 13
13 -
14
-
15
-
16
-
17
-
18
-
19
-
20
-
21
-
22
-
23
-
24
-
25
-
26
-
27
-
28
-
29
-
30
-
31
-
32
-
33
-
34
-
35
-
36
-
37
-
38
-
39
-
40
-
41
-
42
-
43
-
44
-
45
-
46
-
47
-
48
-
49
-
50
-
51
-
52
-
53
-
54
 |
 |

8
|
About Your Monitor
Back View
Back View with monitor stand
Label
Description
Use
1
VESA mounting holes (100 mm x
100 mm - behind attached VESA
Cover)
Wall mount monitor using VESA-
compatible wall mount kit (100 mm x
100 mm).
2
Regulatory label
Lists the regulatory approvals.
3
Stand release button
Release stand from monitor.
4
Security lock slot
Secures monitor with security lock
(security lock not included).
5
Barcode serial number label
Refer to this label if you need to contact
Dell for technical support.
6
Dell Soundbar mounting slots
Attaches the optional Dell Soundbar.
7
Cable management slot
Use to organize cables by placing them
through the slot.