Dell PowerEdge 6350 Dell PowerEdge Systems 6350 Installation and Troubleshooti - Page 151
Rack Installation
 |
View all Dell PowerEdge 6350 manuals
Add to My Manuals
Save this manual to your list of manuals |
Page 151 highlights
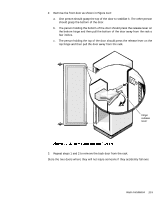
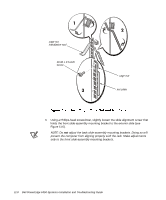
2. Install the cage nuts and nut plates. Install the curved nut plates on the vertical rails where you want the ends of the slide assemblies to be located (see Figure 11-5). Each curved nut plate is held in place by one 10-32 x 0.5-inch Phillips-head screw and one 10-32 cage nut. The following substeps explain how to install the cage nuts and the nut plates: a. Insert the lower lip of the cage nut over the bottom of the opening in the back of a rail as shown in step 1 in Figure 11-5. Then insert the small end of the cage-nut installation tool through the opening in the rail (from the front), and hook the tool over the top lip of the cage nut. b. Push in on the cage nut while rotating the tool up and pulling it back toward you until the top lip of the cage nut snaps into position (see step 1 in Figure 11-5). c. Repeat substeps a and b to install the remaining cage nuts. d. To install one of the curved nut plates, insert it through the hole below the cage nut (from the back of the rail) as shown in step 2 in Figure 11-5. Then secure the nut plate in place with a 10-32 x 0.5-inch Phillips-head screw (see step 3 in Figure 11-5). e. Repeat substeps a through d to install the remaining nut plates. Rack Installation 11-7
-
 1
1 -
2
-
3
-
4
-
5
-
6
-
7
-
8
-
9
-
10
-
11
-
12
-
13
-
14
-
15
-
16
-
17
-
18
-
19
-
20
-
21
-
22
-
23
-
24
-
25
-
26
-
27
-
28
-
29
-
30
-
31
-
32
-
33
-
34
-
35
-
36
-
37
-
38
-
39
-
40
-
41
-
42
-
43
-
44
-
45
-
46
-
47
-
48
-
49
-
50
-
51
-
52
-
53
-
54
-
55
-
56
-
57
-
58
-
59
-
60
-
61
-
62
-
63
-
64
-
65
-
66
-
67
-
68
-
69
-
70
-
71
-
72
-
73
-
74
-
75
-
76
-
77
-
78
-
79
-
80
-
81
-
82
-
83
-
84
-
85
-
86
-
87
-
88
-
89
-
90
-
91
-
92
-
93
-
94
-
95
-
96
-
97
-
98
-
99
-
100
-
101
-
102
-
103
-
104
-
105
-
106
-
107
-
108
-
109
-
110
-
111
-
112
-
113
-
114
-
115
-
116
-
117
-
118
-
119
-
120
-
121
-
122
-
123
-
124
-
125
-
126
-
127
-
128
-
129
-
130
-
131
-
132
-
133
-
134
-
135
-
136
-
137
-
138
-
139
-
140
-
141
-
142
-
143
-
144
-
145
-
 146
146 -
 147
147 -
 148
148 -
 149
149 -
 150
150 -
 151
151 -
 152
152 -
 153
153 -
 154
154 -
 155
155 -
 156
156 -
157
-
158
-
159
-
160
-
161
-
162
-
163
-
164
-
165
-
166
-
167
-
168
-
169
-
170
-
171
-
172
-
173
-
174
-
175
-
176
-
177
-
178
-
179
-
180
-
181
-
182
-
183
-
184
-
185
-
186
-
187
-
188
-
189
-
190
-
191
-
192
-
193
-
194
-
195
-
196
-
197
-
198
-
199
-
200
-
201
-
202
-
203
-
204
-
205
 |
 |