Dell PowerEdge R300 Hardware Owner's Manual (PDF) - Page 120
Using the tab on the system board tray, slide the system board forward
 |
View all Dell PowerEdge R300 manuals
Add to My Manuals
Save this manual to your list of manuals |
Page 120 highlights
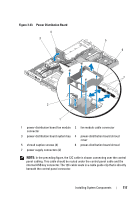
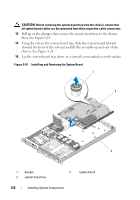
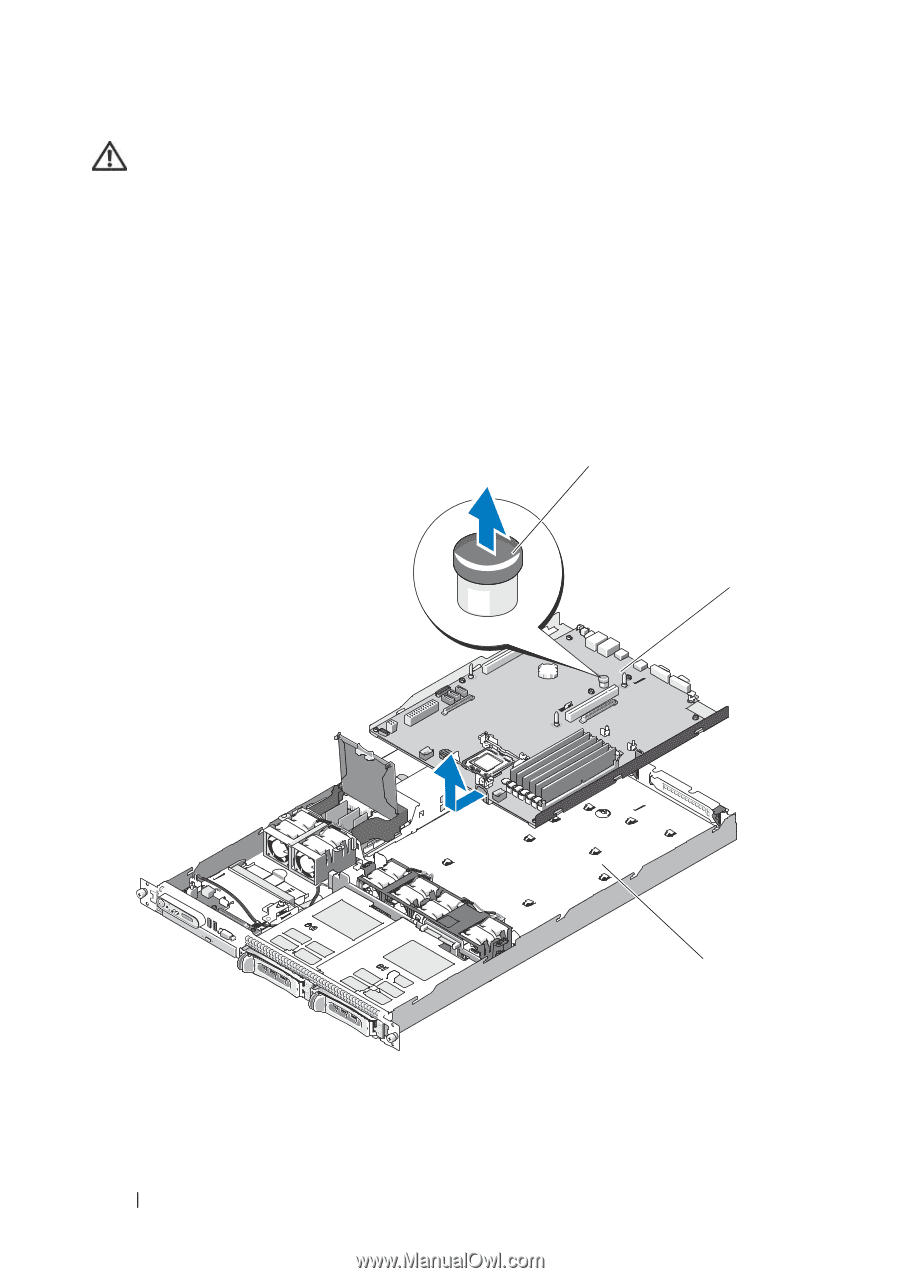
CAUTION: Before removing the system board tray from the chassis, ensure that all system board cables are disconnected from their respective cable connectors. 13 Pull up on the plunger that secures the system board tray to the chassis floor. See Figure 3-24. 14 Using the tab on the system board tray, slide the system board forward (toward the front of the system) and lift the assembly up and out of the chassis. See Figure 3-24. 15 Lay the system board tray down on a smooth, nonconductive work surface. Figure 3-24. Installing and Removing the System Board 1 2 3 1 plunger 3 system board tray 2 system board 120 Installing System Components
-
 1
1 -
2
-
3
-
4
-
5
-
6
-
7
-
8
-
9
-
10
-
11
-
12
-
13
-
14
-
15
-
16
-
17
-
18
-
19
-
20
-
21
-
22
-
23
-
24
-
25
-
26
-
27
-
28
-
29
-
30
-
31
-
32
-
33
-
34
-
35
-
36
-
37
-
38
-
39
-
40
-
41
-
42
-
43
-
44
-
45
-
46
-
47
-
48
-
49
-
50
-
51
-
52
-
53
-
54
-
55
-
56
-
57
-
58
-
59
-
60
-
61
-
62
-
63
-
64
-
65
-
66
-
67
-
68
-
69
-
70
-
71
-
72
-
73
-
74
-
75
-
76
-
77
-
78
-
79
-
80
-
81
-
82
-
83
-
84
-
85
-
86
-
87
-
88
-
89
-
90
-
91
-
92
-
93
-
94
-
95
-
96
-
97
-
98
-
99
-
100
-
101
-
102
-
103
-
104
-
105
-
106
-
107
-
108
-
109
-
110
-
111
-
112
-
113
-
114
-
 115
115 -
 116
116 -
 117
117 -
 118
118 -
 119
119 -
 120
120 -
 121
121 -
 122
122 -
 123
123 -
 124
124 -
 125
125 -
126
-
127
-
128
-
129
-
130
-
131
-
132
-
133
-
134
-
135
-
136
-
137
-
138
-
139
-
140
-
141
-
142
-
143
-
144
-
145
-
146
-
147
-
148
-
149
-
150
-
151
-
152
-
153
-
154
-
155
-
156
-
157
-
158
-
159
-
160
-
161
-
162
-
163
-
164
-
165
-
166
-
167
-
168
-
169
-
170
-
171
-
172
-
173
-
174
-
175
-
176
-
177
-
178
-
179
-
180
-
181
-
182
-
183
-
184
 |
 |
120
Installing System Components
CAUTION:
Before removing the system board tray from the chassis, ensure that
all system board cables are disconnected from their respective cable connectors.
13
Pull up on the plunger that secures the system board tray to the chassis
floor. See Figure 3-24.
14
Using the tab on the system board tray, slide the system board forward
(toward the front of the system) and lift the assembly up and out of the
chassis. See Figure 3-24.
15
Lay the system board tray down on a smooth, nonconductive work surface.
Figure 3-24.
Installing and Removing the System Board
1
plunger
2
system board
3
system board tray
1
3
2