Dell PowerVault 110T SDLT320 User Manual - Page 30
Step 1: Setting the SCSI ID, Setting the SCSI ID, unused, Step 2: Connecting the SCSI
 |
View all Dell PowerVault 110T SDLT320 manuals
Add to My Manuals
Save this manual to your list of manuals |
Page 30 highlights
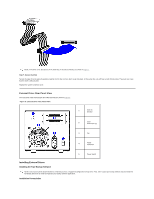
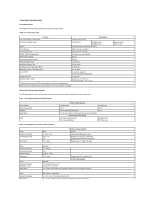
Dell PowerVault 110T SDLT 320 drives are Ultra 2 wide SCSI devices designed to operate on a Low Voltage Differential (LVD) SCSI bus with a burst transfer rate of 80 MB/sec. Dell recommends that you use a dedicated host bus adapter for the tape drive. Never install the drive on a single-ended SCSI bus because this will restrict performance. Do not install the tape drive on the same bus with other single-ended devices because this will switch the LVD host adapter into single-ended mode and restrict performance. Dell PowerVault drives have 68-pin wide, high-density SCSI connectors. To install the tape drive, you need the appropriate Ultra 2 or Ultra wide SCSI ribbon cable with the correct termination. Step-by-Step Installation Instructions Step 1: Setting the SCSI ID Figure 9. Setting the SCSI ID Your Dell PowerVault drive is shipped with a default SCSI ID of 6, but you can opt to use any unused ID between 0 and 15, except 7. Do not use SCSI ID 7; that ID is reserved for the SCSI controller. NOTE: Each device on the SCSI bus must have a unique SCSI ID address. For specific recommendations for assigning SCSI IDs, refer to the system or SCSI controller documentation. Change the tape drive's SCSI ID, if necessary, by using a small screwdriver or a ball-point pen to press the upper or lower SCSI ID selector block on the rear panel until the required value is displayed. Do not use a pencil because bits of pencil lead could contaminate the drive. Figure 9 shows the location of the SCSI ID selector block. NOTE: The computer system and the tape drive SCSI IDs are only checked at power-on. To change the SCSI ID after installation, power down both the system and the tape drive, change the drive's SCSI ID, power up the tape drive, and then power up the system. Step 2: Connecting the SCSI Cable Figure 10. Connecting the SCSI Cable
-
 1
1 -
2
-
3
-
4
-
5
-
6
-
7
-
8
-
9
-
10
-
11
-
12
-
13
-
14
-
15
-
16
-
17
-
18
-
19
-
20
-
21
-
22
-
23
-
24
-
 25
25 -
 26
26 -
 27
27 -
 28
28 -
 29
29 -
 30
30 -
 31
31 -
 32
32 -
 33
33 -
 34
34 -
 35
35 -
36
-
37
-
38
-
39
-
40
-
41
-
42
-
43
 |
 |
