Dell PowerVault 110T SDLT320 User Manual - Page 42
Loading, Unloading, and Write-Protecting Cartridges
 |
View all Dell PowerVault 110T SDLT320 manuals
Add to My Manuals
Save this manual to your list of manuals |
Page 42 highlights
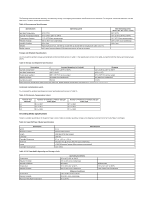
Cleaning Required LED (Right) Eject Button Yellow l The tape is moving l The drive is calibrating, reading, writing, or rewinding the tape l The tape is loading, unloading, or rewinding. On = The drive is idle. There may or may not be a cartridge in the tape drive. Off = The tape drive has not been turned on or is not plugged into a power source. On = Cleaning required Off = Cleaning is not required Press the Eject button to eject the tape cartridge from the drive. When you press the button, the drive completes any active writing of data to the tape, then ejects the cartridge. Loading, Unloading, and Write-Protecting Cartridges Use Super DLTtape I cartridges with your drive. (Note: The PowerVault 110T tape drive will read, but not write, DLTtape IV cartridges.) Ensure that only one label is affixed to the label area of the cartridge. Never use non-standard labels, and never stick anything to the cartridge other than in the label area. Loading a Tape Cartridge Figure 3. Loading To load a tape cartridge, follow these steps: 1. Insert the cartridge into the front of the drive as shown in Figure 3. 2. Push the cartridge fully into the drive. The tape will load automatically. The Drive Status LED blinks to show that the tape is loading. When the LED lights steadily, the tape is ready for use. Unloading a Tape Cartridge To unload a tape cartridge, press the Eject button on the front panel (item 3 in Figure 3). During the unload sequence, the Drive Status LED blinks. The drive completes any active writing of data to the tape, rewinds the tape to the beginning, and ejects the cartridge. Remove the cartridge and store it in its plastic case in a cool, dry environment. For more information, refer to the Cartridge Care and Cleaning section. Setting the Write-Protect Switch on Tape Cartridges Each tape cartridge has a write-protect switch that you can use to prevent accidental erasure of data. Before inserting the tape cartridge into the tape drive, position the writeprotect switch on the front of the cartridge (Figure 4). You must do this before you insert the cartridge. If you slide the write-protect switch on the cartridge after the cartridge is inserted in the drive, the change will not take effect until you remove and reinsert the cartridge. CAUTION: Setting the write-protect switch will not prevent a cartridge from being erased by bulk-erasure or degaussing. Figure 4. Setting the Write-Protect Switch
-
 1
1 -
2
-
3
-
4
-
5
-
6
-
7
-
8
-
9
-
10
-
11
-
12
-
13
-
14
-
15
-
16
-
17
-
18
-
19
-
20
-
21
-
22
-
23
-
24
-
25
-
26
-
27
-
28
-
29
-
30
-
31
-
32
-
33
-
34
-
35
-
36
-
 37
37 -
 38
38 -
 39
39 -
 40
40 -
 41
41 -
 42
42 -
 43
43
 |
 |
