Dell PowerVault 110T SDLT320 User Manual - Page 41
Using the Tape Drive: Dell, PowerVault, 110T SDLT 320 Tape Drive User's Guide
 |
View all Dell PowerVault 110T SDLT320 manuals
Add to My Manuals
Save this manual to your list of manuals |
Page 41 highlights
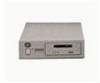
Back to Contents Page Using the Tape Drive: Dell™ PowerVault™ 110T SDLT 320 Tape Drive User's Guide • Switching on the Drive • Front Panel Functionality • Loading, Unloading, and Write-Protecting Cartridges Switching on the Drive Switch on an external drive using the power switch on the rear panel (Figure 1), and then switch on the computer system. The tape drive will run its hardware self-test. This power-on self-test will complete in about 10 seconds. At the end of the hardware self-test, the Drive Status LED should be on. Figure 1. Switching on the Drive If You Have Problems During Self Test If the drive fails to execute power-on self-test and the LEDs remain off, ensure that power is being supplied to the drive. You can use the power cable from your monitor or another device to check that the connection is working. For more information, refer to the Troubleshooting section. Front Panel LED/Control Functionality Figure 2. Front Panel LEDs Drive 1 Density LED (Amber) Drive 2 Status LED (Green) Cleaning 3 Required LED (Yellow) 4 Eject Button LED/Button Drive Density LED (Left) Drive Status LED (Center) Symbol LED Color Amber Green Description On = The tape is 220-formatted Off = The tape is 320-formatted Blinking = The tape drive is in use. This includes functions such as:
-
 1
1 -
2
-
3
-
4
-
5
-
6
-
7
-
8
-
9
-
10
-
11
-
12
-
13
-
14
-
15
-
16
-
17
-
18
-
19
-
20
-
21
-
22
-
23
-
24
-
25
-
26
-
27
-
28
-
29
-
30
-
31
-
32
-
33
-
34
-
35
-
 36
36 -
 37
37 -
 38
38 -
 39
39 -
 40
40 -
 41
41 -
 42
42 -
 43
43
 |
 |
