Dell SP2009WFP Dell SP2009W Flat Panel Monitor - Page 29
Back to Contents
 |
View all Dell SP2009WFP manuals
Add to My Manuals
Save this manual to your list of manuals |
Page 29 highlights
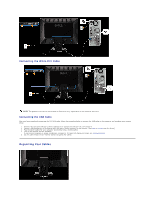
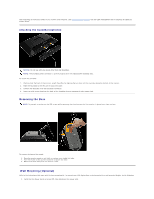
2. Lay the LCD display face down on a towel or blanket. 3. Remove the Plastic Covers from the back of the LCD display. 4. Remove the four screws attaching the base (Screw dimension: M4 x 10mm). 5. Remove the Rubber Plugs from inside the four VESA screw holes. 6. Attach the mounting bracket from the VESA compatible wall mounting kit (100 mm x 100 mm distance). 7. Attach the LCD display to the wall, following the instructions in the wall-mounting kit. NOTE: For use only with UL Listed Wall Mount Bracket with minimum weight/load: 4.44kg. Back to Contents Page
-
 1
1 -
2
-
3
-
4
-
5
-
6
-
7
-
8
-
9
-
10
-
11
-
12
-
13
-
14
-
15
-
16
-
17
-
18
-
19
-
20
-
21
-
22
-
23
-
 24
24 -
 25
25 -
 26
26 -
 27
27 -
 28
28 -
 29
29 -
 30
30 -
 31
31 -
 32
32 -
 33
33 -
 34
34
 |
 |

2.
Lay the LCD display face down on a towel or blanket.
3.
Remove the Plastic Covers from the back of the LCD display.
4.
Remove the four screws attaching the base (Screw dimension: M4 x 10mm).
5.
Remove the Rubber Plugs from inside the four VESA screw holes.
6.
Attach the mounting bracket from the VESA compatible wall mounting kit (100 mm x 100 mm distance).
7.
Attach the LCD display to the wall, following the instructions in the wall-mounting kit.
Back to Contents Page
NOTE:
For use only with UL Listed Wall Mount Bracket with minimum weight/load: 4.44kg.