Dell SP2309WFP User's Guide - Page 17
Menu and Submenus, Description, BRIGHTNESS/CONTRAST, Brightness, Contrast, Auto Adjust, Input Source
 |
View all Dell SP2309WFP manuals
Add to My Manuals
Save this manual to your list of manuals |
Page 17 highlights
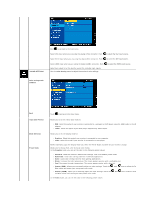
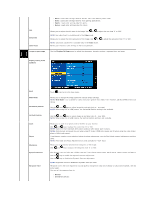
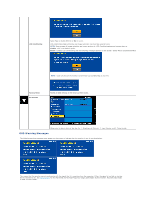
2. Touch the and keys to toggle between options in the Menu. As you move from one icon to another, the option name is highlighted. 3. To select the highlighted item on the menu touch the again. 4. Touch the and keys to select the desired parameter. 5. Touch the key to enter the slide bar and then use the or key, according to the indicators on the menu, to make your changes. 6. Select the to return to previous menu without accepting current settings or to accept and return to previous menu. The table below provides a list of all the OSD menu options and their functions. Icon Menu and Submenus Description BRIGHTNESS/CONTRAST Use the Brightness and Contrast menu to adjust the Brightness/Contrast. Back Brightness Contrast Auto Adjust Touch to go back to the main menu. Allows you to adjust the brightness or luminance of the backlight. Touch the key to increase brightness and touch the key to decrease brightness (min 0 ~ max 100). Allows you to adjust the contrast or the degree of difference between darkness and lightness on the monitor screen. Adjust brightness first, and adjust contrast only if you need further adjustment. Touch the key to increase contrast and touch the key to decrease contrast (min 0 ~ max 100). Use this key to activate automatic setup and adjust menu. The following dialog appears on a black screen as the monitor self adjusts to the current input: Input Source Auto Adjustment allows the monitor to self-adjust to the incoming video signal. After using Auto Adjustment, you can further tune your monitor by using the Pixel Clock (Coarse) and Phase (Fine) controls under Image Settings. NOTE: Auto Adjust does not occur if you touch the key while there are no active video input signals or attached cables. Use the Input Source menu to select different video signals that may be connected to your monitor.
-
 1
1 -
2
-
3
-
4
-
5
-
6
-
7
-
8
-
9
-
10
-
11
-
 12
12 -
 13
13 -
 14
14 -
 15
15 -
 16
16 -
 17
17 -
 18
18 -
 19
19 -
 20
20 -
 21
21 -
 22
22 -
23
-
24
-
25
-
26
-
27
-
28
-
29
-
30
-
31
-
32
-
33
-
34
-
35
-
36
 |
 |
