Dell U2518D UltraSharp Users Guide - Page 26
Adjusting the Rotation Display Settings of Your System, Connecting Your Monitor
 |
View all Dell U2518D manuals
Add to My Manuals
Save this manual to your list of manuals |
Page 26 highlights
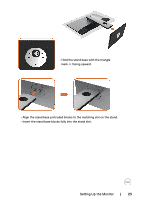
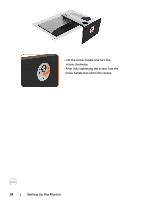
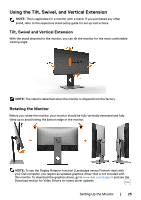
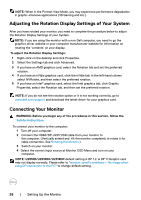
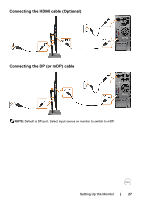
NOTE: When in the Portrait View Mode, you may experience performance degradation in graphic-intensive applications (3D Gaming and etc.). Adjusting the Rotation Display Settings of Your System After you have rotated your monitor, you need to complete the procedure below to adjust the Rotation Display Settings of your System. NOTE: If you are using the monitor with a non-Dell computer, you need to go the graphics driver website or your computer manufacturer website for information on rotating the 'contents' on your display. To adjust the Rotation Display Settings: 1 Right-click on the desktop and click Properties. 2 Select the Settings tab and click Advanced. 3 If you have an AMD graphics card, select the Rotation tab and set the preferred rotation. 4 If you have an nVidia graphics card, click the nVidia tab, in the left-hand column select NVRotate, and then select the preferred rotation. 5 If you have an Intel® graphics card, select the Intel graphics tab, click Graphic Properties, select the Rotation tab, and then set the preferred rotation. NOTE: If you do not see the rotation option or it is not working correctly, go to www.dell.com/support and download the latest driver for your graphics card. Connecting Your Monitor WARNING: Before you begin any of the procedures in this section, follow the Safety Instructions. To connect your monitor to the computer: 1 Turn off your computer. 2 Connect the HDMI/DP-mDP/USB cable from your monitor to the computer. (Vertically extend and tilt the monitor completely to rotate it for cable connection. See Rotating the Monitor.) 3 Switch on your monitor. 4 Select the correct input source at Monitor OSD Menu and turn on your computer. NOTE: U2518D/U2518DX/U2518DR default setting is DP 1.2. A DP 1.1 Graphic card may not display normally. Please refer to "product specific problems - No image when using DP connection to the PC" to change default setting. 26 | Setting Up the Monitor
-
 1
1 -
2
-
3
-
4
-
5
-
6
-
7
-
8
-
9
-
10
-
11
-
12
-
13
-
14
-
15
-
16
-
17
-
18
-
19
-
20
-
 21
21 -
 22
22 -
 23
23 -
 24
24 -
 25
25 -
 26
26 -
 27
27 -
 28
28 -
 29
29 -
 30
30 -
 31
31 -
32
-
33
-
34
-
35
-
36
-
37
-
38
-
39
-
40
-
41
-
42
-
43
-
44
-
45
-
46
-
47
-
48
-
49
-
50
-
51
-
52
-
53
-
54
-
55
-
56
-
57
 |
 |