Dell U2518D UltraSharp Users Guide - Page 8
Back View, Side View, Label, Description, USB downstream port
 |
View all Dell U2518D manuals
Add to My Manuals
Save this manual to your list of manuals |
Page 8 highlights
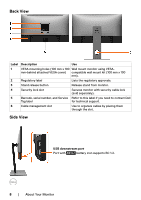
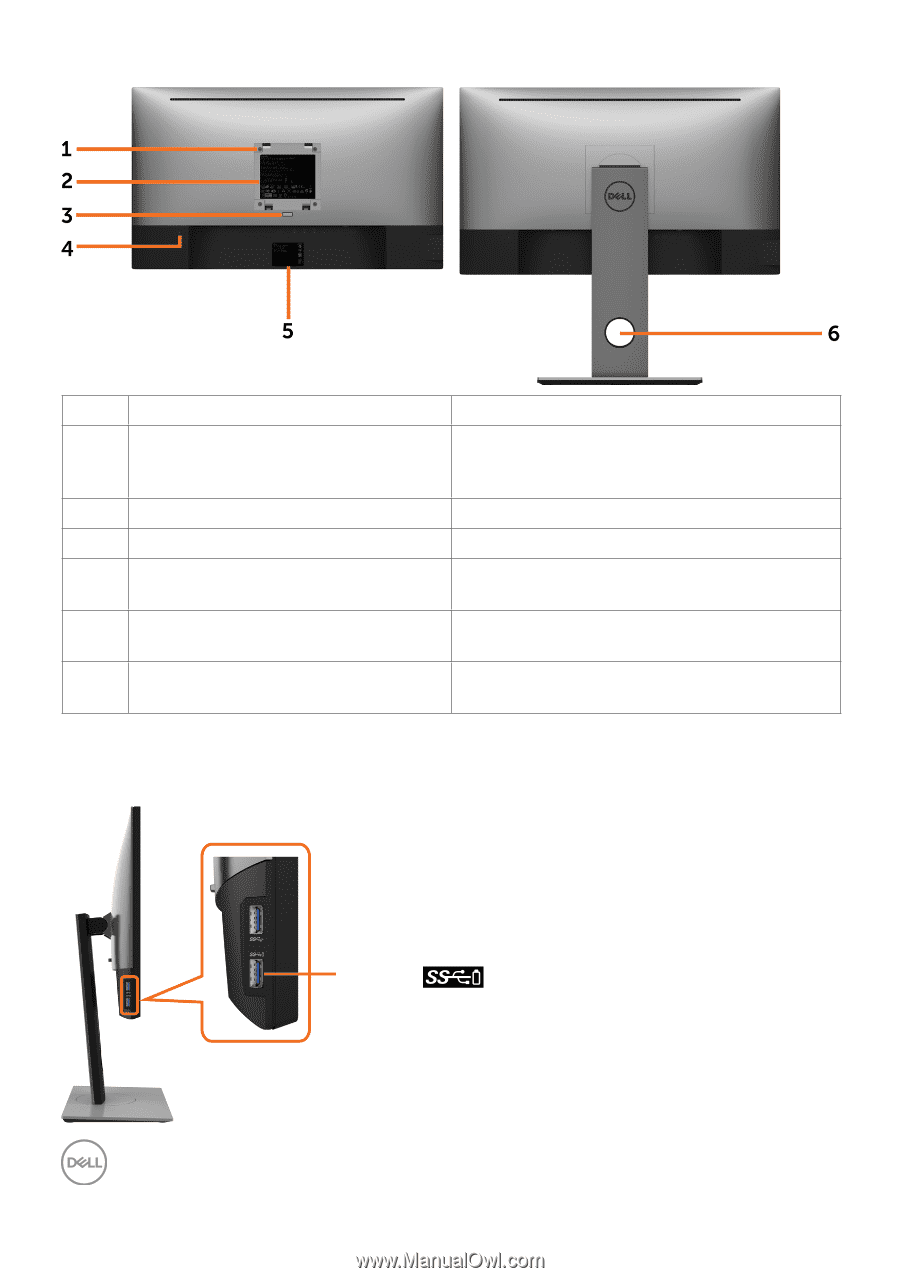
Back View Label Description Use 1 VESA mounting holes (100 mm x 100 Wall mount monitor using VESA- mm-behind attached VESA cover) compatible wall mount kit (100 mm x 100 mm). 2 Regulatory label Lists the regulatory approvals. 3 Stand release button Release stand from monitor. 4 Security lock slot Secures monitor with security cable lock (sold separately). 5 Barcode, serial number, and Service Refer to this label if you need to contact Dell Tag label for technical support. 6 Cable management slot Use to organize cables by placing them through the slot. Side View USB downstream port Port with battery icon supports BC 1.2. 8 | About Your Monitor
-
 1
1 -
2
-
 3
3 -
 4
4 -
 5
5 -
 6
6 -
 7
7 -
 8
8 -
 9
9 -
 10
10 -
 11
11 -
 12
12 -
 13
13 -
14
-
15
-
16
-
17
-
18
-
19
-
20
-
21
-
22
-
23
-
24
-
25
-
26
-
27
-
28
-
29
-
30
-
31
-
32
-
33
-
34
-
35
-
36
-
37
-
38
-
39
-
40
-
41
-
42
-
43
-
44
-
45
-
46
-
47
-
48
-
49
-
50
-
51
-
52
-
53
-
54
-
55
-
56
-
57
 |
 |
8
|
About Your Monitor
Back View
Label
Description
Use
1
VESA mounting holes (100 mm x 100
mm-behind attached VESA cover)
Wall mount monitor using VESA-
compatible wall mount kit (100 mm x 100
mm).
2
Regulatory label
Lists the regulatory approvals.
3
Stand release button
Release stand from monitor.
4
Security lock slot
Secures monitor with security cable lock
(sold separately).
5
Barcode, serial number, and Service
Tag label
Refer to this label if you need to contact Dell
for technical support.
6
Cable management slot
Use to organize cables by placing them
through the slot.
Side View
USB downstream port
Port with
battery icon supports BC 1.2.