Dell U4021QW Users Guide - Page 74
Product specific problems, Troubleshooting, NOTE: Thunderbolt, is not supported Windows 7., Problem
 |
View all Dell U4021QW manuals
Add to My Manuals
Save this manual to your list of manuals |
Page 74 highlights
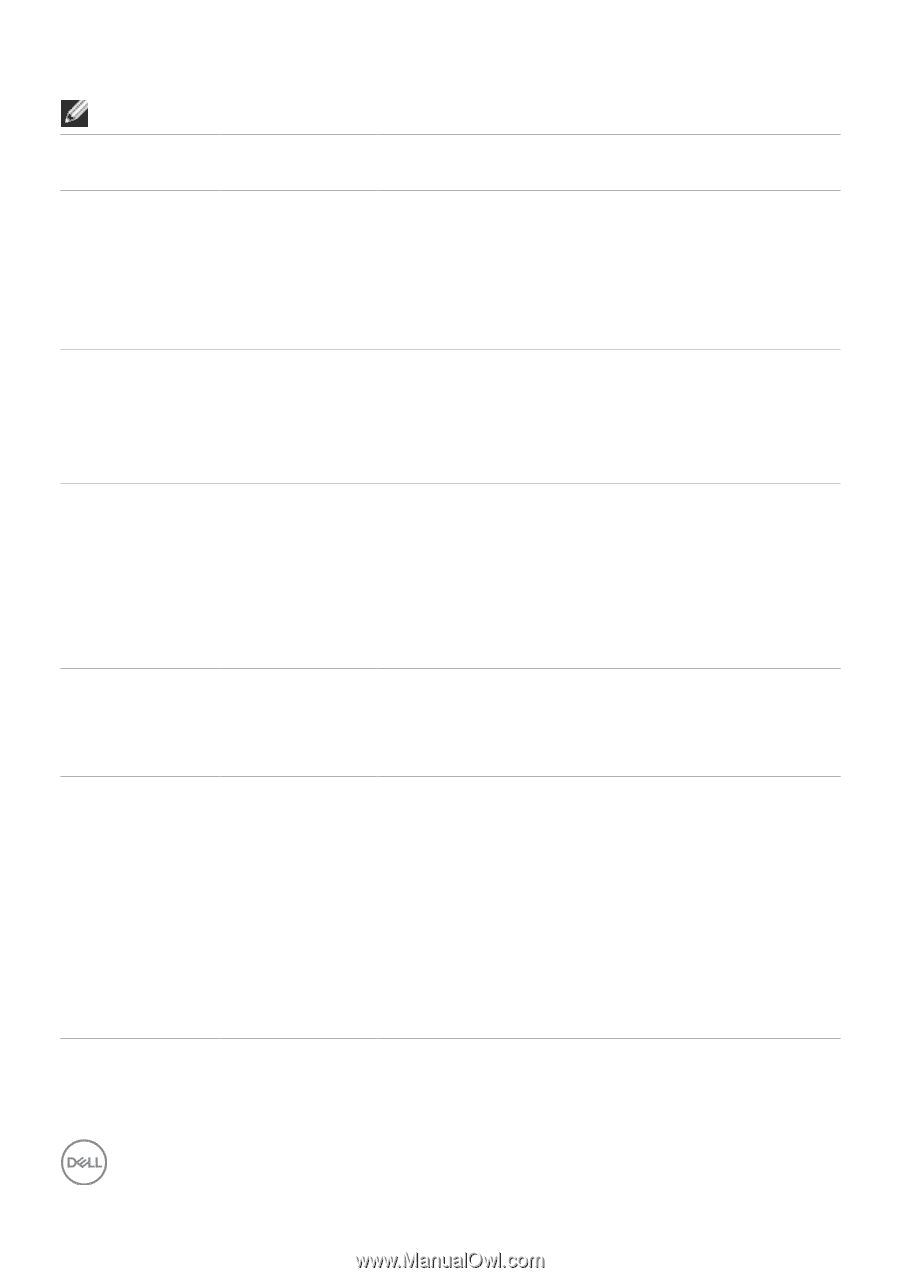
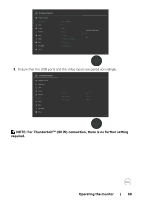
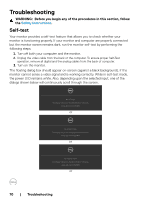
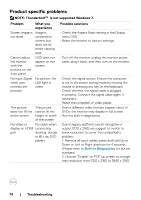
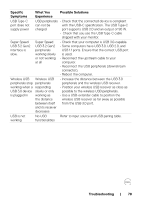
Product specific problems NOTE: ThunderboltTM is not supported Windows 7. Problem What you experience Screen image is Image is too small centered on screen, but does not fill entire viewing area Cannot adjust the monitor with the buttons on the front panel OSD does not appear on the screen No Input Signal when user controls are pressed No picture, the LED light is white The picture does not fill the entire screen The picture cannot fill the height or width of the screen No Video or No video when display on HDMI connecting port docking, dongle or Blu-ray DVD players Possible solutions • Check the Aspect Ratio setting in the Display menu OSD. • Reset the monitor to factory settings. • Turn off the monitor, unplug the monitor power cable, plug it back, and then turn on the monitor. • Check the signal source. Ensure the computer is not in the power saving mode by moving the mouse or pressing any key on the keyboard. • Check whether the signal cable is plugged in properly. Connect the signal cable again, if necessary. • Reset the computer or video player. • Due to different video formats (aspect ratio) of DVDs, the monitor may display in full screen. • Run the built-in diagnostics. • Due to legacy platform cannot recognize or output 5120 x 2160, we suggest to switch to lower resolution to cover this compatibility problem: 1. Remove all input cables, press and hold Up or Down or Left or Right direction for 4 seconds . (Please refer to Built-in Diagnostics for button numbers) 2. Choose "Enable" on POP up screen to change max resolution from 5120 x 2160 to 3840 x 2160. 74 | Troubleshooting
-
 1
1 -
2
-
3
-
4
-
5
-
6
-
7
-
8
-
9
-
10
-
11
-
12
-
13
-
14
-
15
-
16
-
17
-
18
-
19
-
20
-
21
-
22
-
23
-
24
-
25
-
26
-
27
-
28
-
29
-
30
-
31
-
32
-
33
-
34
-
35
-
36
-
37
-
38
-
39
-
40
-
41
-
42
-
43
-
44
-
45
-
46
-
47
-
48
-
49
-
50
-
51
-
52
-
53
-
54
-
55
-
56
-
57
-
58
-
59
-
60
-
61
-
62
-
63
-
64
-
65
-
66
-
67
-
68
-
 69
69 -
 70
70 -
 71
71 -
 72
72 -
 73
73 -
 74
74 -
 75
75 -
 76
76 -
 77
77 -
 78
78 -
 79
79 -
80
 |
 |