Denon AVR-2802 Owners Manual - Page 21
Playback using the external input EXT. IN jacks, Example: Stereo, Input mode display, NOTES - subwoofer
 |
View all Denon AVR-2802 manuals
Add to My Manuals
Save this manual to your list of manuals |
Page 21 highlights
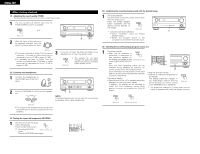
ENGLISH Input mode display 3 Select the play mode. Press the SURROUND MODE button, then turn • In the AUTO mode the SELECT knob. AUTO INPUT PCM DTS One of these lights, depending on the input signal. DIGITAL ANALOG Example: Stereo SURROUND MODE SELECT STEREO • In the DIGITAL PCM mode AUTO INPUT PCM DTS DIGITAL (Main unit) (Remote control unit) To select the surround mode while adjusting the surround parameters, channel volume or tone control, press the surround mode button then operate the selector. SURROUND MODE (Main unit) • In the DIGITAL DTS mode AUTO INPUT PCM DTS • In the ANALOG mode AUTO INPUT PCM DTS Input signal display • DOLBY DIGITAL DIGITAL ANALOG 4 Start playback on the selected component. • For operating instructions, refer to the SIGNAL DIGITAL component's manual. • DTS SIGNAL 5 Adjust the volume. MASTER VOLUME DIGITAL • PCM SIGNAL DIGITAL MASTER VOL. The volume level is displayed on the master volume level display. (Main unit) (Remote control unit) The volume can be adjusted within the range of -70 to 0 to 18 dB, in steps of 1 dB. However, when the channel level is set as described on page 12 or page 24, if the volume for any channel is set at +1 dB or greater, the volume cannot be adjusted up to 18 dB. (In this case the maximum volume adjustment range is "18 dB - (Maximum value of channel level)".) Input mode when playing DTS sources • Noise will be output if DTS-compatible CDs or LDs are played in the "ANALOG" or "PCM" mode. When playing DTS-compatible sources, be sure to connect the source component to the digital input jacks (OPTICAL/COAXIAL) and set the input mode to "DTS". The DIGITAL indicator lights when digital signals are being input properly. If the DIGITAL indicator does not light, check whether the digital input component setup (page 13) and connections are correct and whether the component's power is turned on. NOTE: • The DIGITAL indicator will light when playing CD-ROMs containing data other than audio signals, but no sound will be heard. Playback using the external input (EXT. IN) jacks 1 Set the external input (EXT. IN) mode. Press the EXT. IN to switch the external input. EXT.IN EXT.IN B REMOTE SENSOR STAND BY LOCK AUTO SIGNAL DIGITAL INPUT DIGITAL PCM VOLUME LEVEL (Main unit) (Remote control unit) Once this is selected, the input signals connected to the FL (front left), FR (front right), C (center), SL (surround left) and SR (surround right) channels of the EXT. IN jacks are output directly to the front (left and right), center and surround (left and right) speaker systems as well as the pre-out jacks without passing through the surround circuitry. In addition, the signal input to the SW (subwoofer) jack is output to the PRE OUT SUBWOOFER jack. 2 Cancelling the external input mode To cancel the external input (EXT. IN) setting, press the input mode (AUTO, PCM, DTS) or ANALOG button to switch to the desired input mode. (See page 20.) INPUT MODE ANALOG INPUT MODE ANALOG (Main unit) (Remote control unit) • When the input mode is set to the external input (EXT. IN), the play mode (DIRECT, STEREO, DOLBY/DTS SURROUND, 5/6CH STEREO or DSP SIMULATION) cannot be set. 21 2 VOLUME DISC SKIP+ SPEAKER DOLBY / DTS SURROUND DIRECT DSP SIMULATION 5CH / 6CH STEREO INPUT MODE ANALOG STEREO EXT.IN MASTER VOL. AUDIO TAPE CDR/MD CD MULTI MUTING AVR/AVC VIDEO TUNING DVD TV VDP VCR SYSTEM SETUP SURROUND PARAMETER BAND MODE RDS PTY TITLE MENU/GUIDE CH SELECT ENTER SELECT 1 NOTES: • In play modes other than the external input mode, the signals connected to these jacks cannot be played. In addition, signals cannot be output from channels not connected to the input jacks. • The external input mode can be set for any input source. To watch video while listening to sound, select the input source to which the video signal is connected, then set this mode. 21
-
 1
1 -
2
-
3
-
4
-
5
-
6
-
7
-
8
-
9
-
10
-
11
-
12
-
13
-
14
-
15
-
 16
16 -
 17
17 -
 18
18 -
 19
19 -
 20
20 -
 21
21 -
 22
22 -
 23
23 -
 24
24 -
 25
25 -
 26
26 -
27
-
28
-
29
-
30
-
31
-
32
-
33
-
34
-
35
-
36
-
37
-
38
-
39
-
40
-
41
-
42
-
43
-
44
-
45
-
46
-
47
-
48
-
49
-
50
-
51
-
52
-
53
-
54
-
55
-
56
-
57
-
58
-
59
-
60
-
61
-
62
-
63
-
64
-
65
-
66
-
67
-
68
-
69
-
70
-
71
-
72
-
73
-
74
 |
 |
